How to Mask in Photoshop: Quick Steps
- Open your image in Photoshop.
- Select the layer you want to edit.
- Click the Add Layer Mask icon.
- Choose the Brush Tool.
- Paint black to hide areas or white to reveal them.
- Refine the mask until you get the desired result.
Are you looking to digitally erase an unwanted element, change the background, or blend two pictures? The Photoshop masking technique allows you to do that while keeping your original photo intact! This is one of the most practical editing techniques worth mastering. Since masking techniques can be applied to small corrections as well as completely new photo creations, let’s go through how masking in Photoshop works.

Table of contents
What Is Masking in Photoshop?
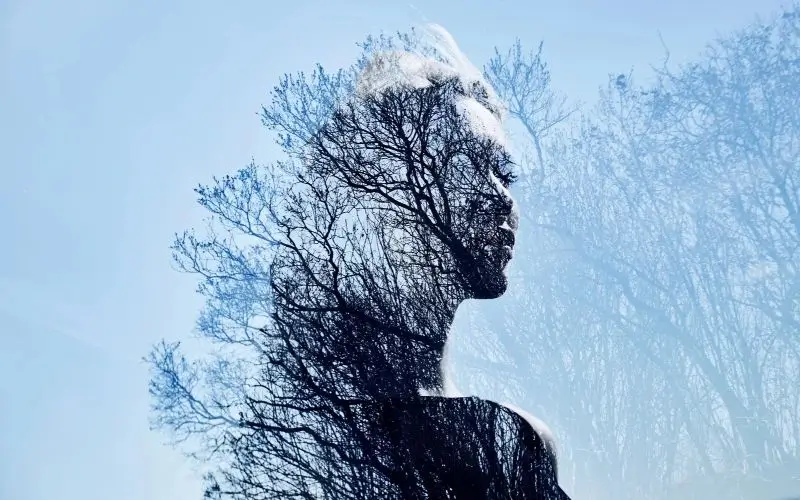
In Photoshop, masking refers to the process of hiding or revealing particular segments of the layer without compromising its pixels. Basically, it acts like a shield that helps you choose what part of the photo should be visible.
For instance, let’s assume you have a portrait shot taken against a busy background. You want to keep the person visible, but you want everything around them to be out of sight. Obviously, you don’t want to erase the background; instead, you should apply layer masking. This way, the person will still be seen, and the unnecessary background will be concealed.
This makes masking a non-destructive editing technique. You can change your mind, correct mistakes, and adjust your edits without starting over.
Photoshop offers different ways to work with masks, but they all help you control the visibility of image elements. Once you understand how they work, you can use them for everything from simple background removal to complex photo composites.
Want to explore Photoshop masking in greater depth? Check out our Photoshop Masking Masterclass to learn more techniques and take your editing skills further.
Types of Masks in Photoshop
Photoshop offers several types of masks, each designed for a different editing purpose. The three commonly used types are layer masks, clipping masks, and vector masks.
Let’s look at what each one does.
1. Layer Masks
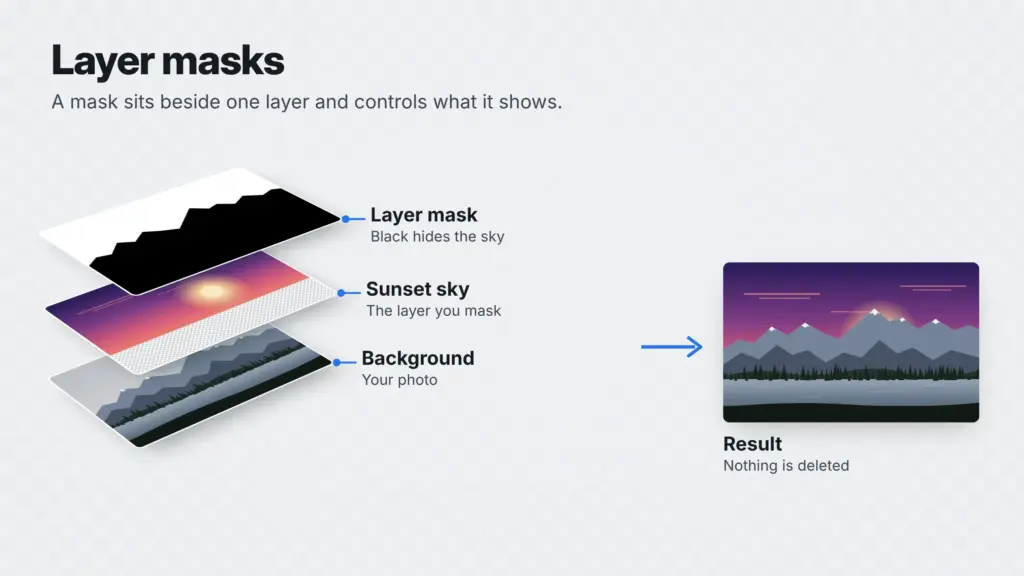
Masks made from layers are among the most popular masking techniques found in Photoshop. They allow for hiding or revealing parts of the layer and enable users to do so without making irreversible changes to the source image.
They operate using three fundamental colors:
- White: Keeps the area visible.
- Black: Hides the area.
- Gray: Makes the area partially transparent.
For example, if you’re removing the background from a portrait, you can use black on the mask to hide the background while keeping the person visible. If you accidentally hide part of the person’s hair or clothing, simply paint over that area with white to bring it back.
Layer masks are especially useful for background removal, photo blending, selective adjustments, and photo retouching.
2. Clipping Masks
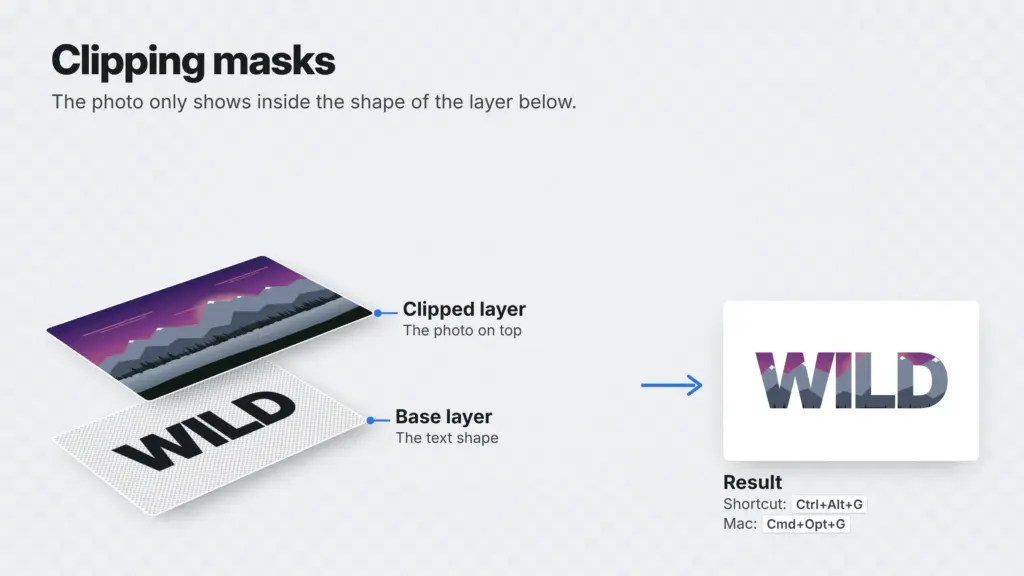
A clipping mask works a little differently. Instead of using black and white to control visibility, it uses the contents of one layer to control which parts of the layer above it are visible.
The bottom layer acts as the base. The layer above it takes on the visible shape of that base layer.
For example, imagine you want to place a photograph inside a circle. You can create a circular shape on one layer and place your photograph above it. Once you create a clipping mask, the photograph appears only within the circle.
Clipping masks are useful for:
- Placing photographs inside text or shapes.
- Adding textures to specific objects.
- Creating photo frames.
- Applying adjustments to individual layers.
How to create a clipping mask in Photoshop:
- Open your image and create a shape or text layer that you want to use as the base.
- Place the photograph or other layer directly above it in the Layers panel.
- Select the upper layer.
- Go to Layer > Create Clipping Mask.
- Your upper layer will now appear only within the visible boundaries of the base layer.
You can also hold Alt (Windows) or Option (Mac) and click the line between the two layers in the Layers panel.
Your next read: How to Read Light in Photography
3. Vector Masks
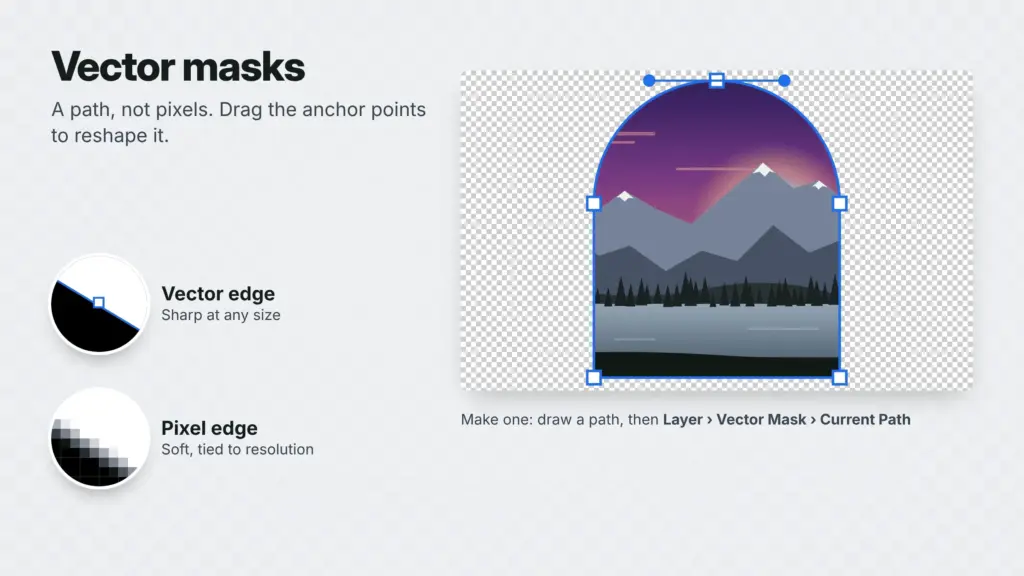
Vector masks use paths and shapes to control which parts of a layer are visible. Unlike regular layer masks, which are pixel-based, vector masks use mathematical paths to define their edges.
This makes them useful when you need clean, sharp boundaries that can be resized without losing quality.
For example, if you’re creating a product image with a precise geometric cutout or placing a photograph inside a custom shape, a vector mask can help you achieve clean results.
You can create vector masks using Photoshop’s Pen Tool or Shape Tools. They are particularly useful for logos, graphics, product images, and designs that need precise edges.
Learning how to mask in Photoshop is just the beginning. The real improvement comes with practice and experimenting with different techniques. Join the PhotoWhoa Studio Community to connect with fellow photography enthusiasts, take part in creative challenges, and keep improving your editing skills.
How to Mask in Photoshop: Step-by-Step Guide
Now that you understand the basics, let’s create a layer mask in Photoshop.
For this tutorial, we’ll use a simple example. Imagine you have a portrait photograph and want to hide certain parts of the background while keeping the subject visible.
Follow these steps to get started.
Step 1: Open Your Image in Photoshop
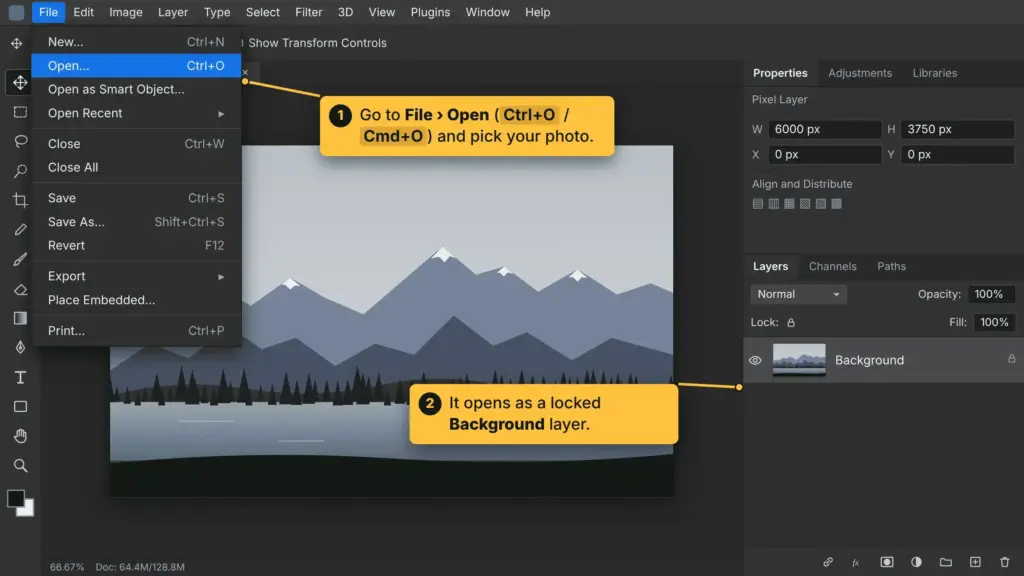
Start by opening Photoshop and loading the image you want to edit.
Go to File > Open and select your photograph from your computer. Your image will appear on the Photoshop canvas.
Once the image is open, look for the Layers panel. You’ll usually find it on the right side of the workspace. This is where you’ll manage your image layers and masks.
If your image appears as a locked background layer, click the lock icon to unlock it if you need to work with transparency.
Step 2: Select the Layer You Want to Mask
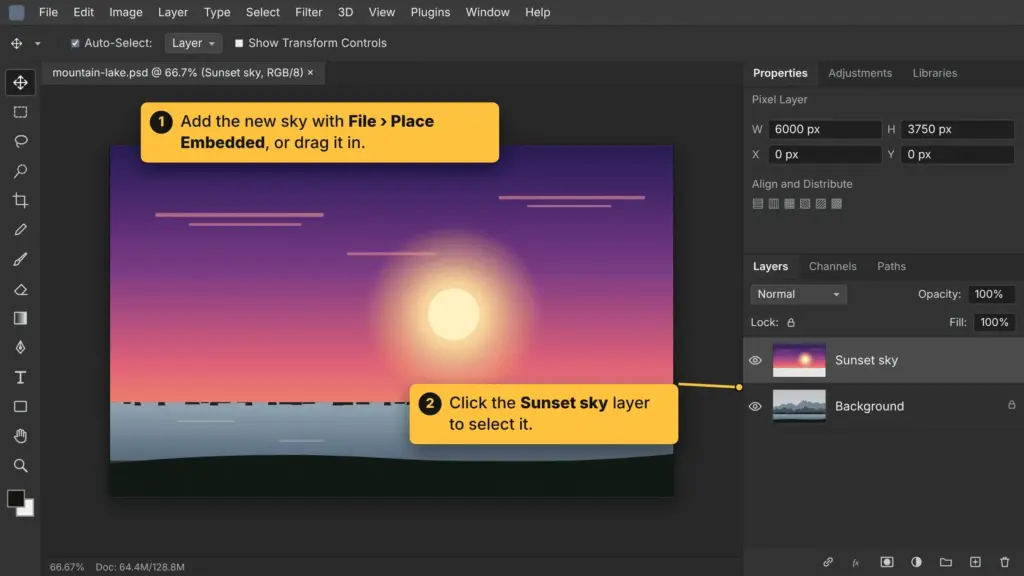
Before creating a mask, make sure you’ve selected the correct layer.
In the Layers panel, click the layer you want to edit. If your project contains multiple layers, take a moment to check which one you’re working on.
This step is important because the mask will affect the selected layer. If you select the wrong one, you may end up hiding parts of an image you didn’t intend to edit.
Step 3: Add a Layer Mask
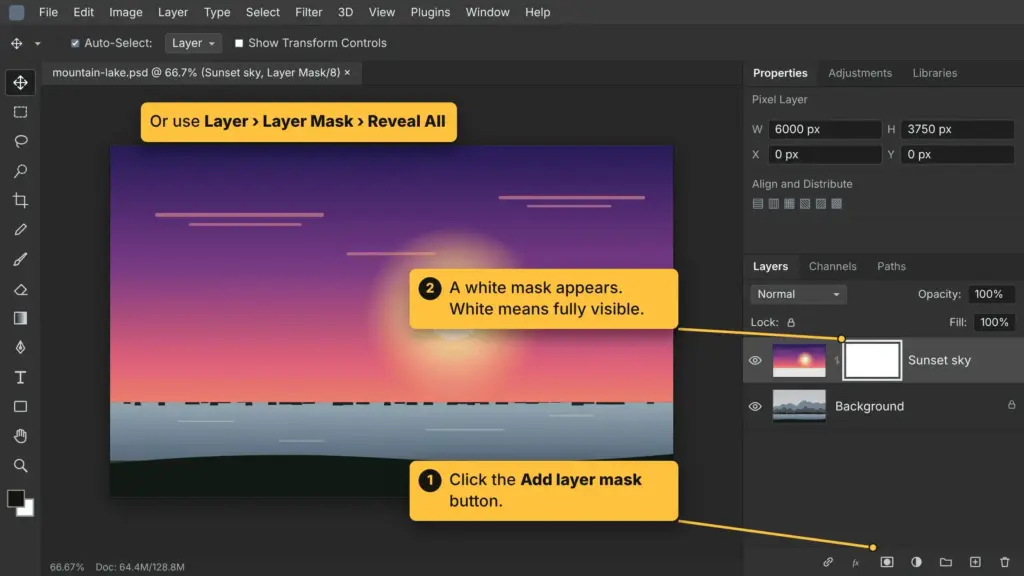
Once you’ve selected your layer, it’s time to create a layer mask in Photoshop.
Look at the bottom of the Layers panel. You’ll find an icon that looks like a rectangle with a circle inside it. This is the Add Layer Mask button.
Click it to add a layer mask to your selected layer.
A white thumbnail will appear next to your image thumbnail. This is your layer mask.
A white mask reveals the entire layer, so your image will look the same as before. You can now paint on the mask to hide or reveal specific areas.
Tip: If you have already made a selection and want to mask only that area, click the Add Layer Mask button with the selection active. Photoshop will use your selection to create the mask.
Also read: Why Are My Photos Blurry? Common Causes & How to Get Sharp Photos
Step 4: Use the Brush Tool to Hide or Reveal Areas
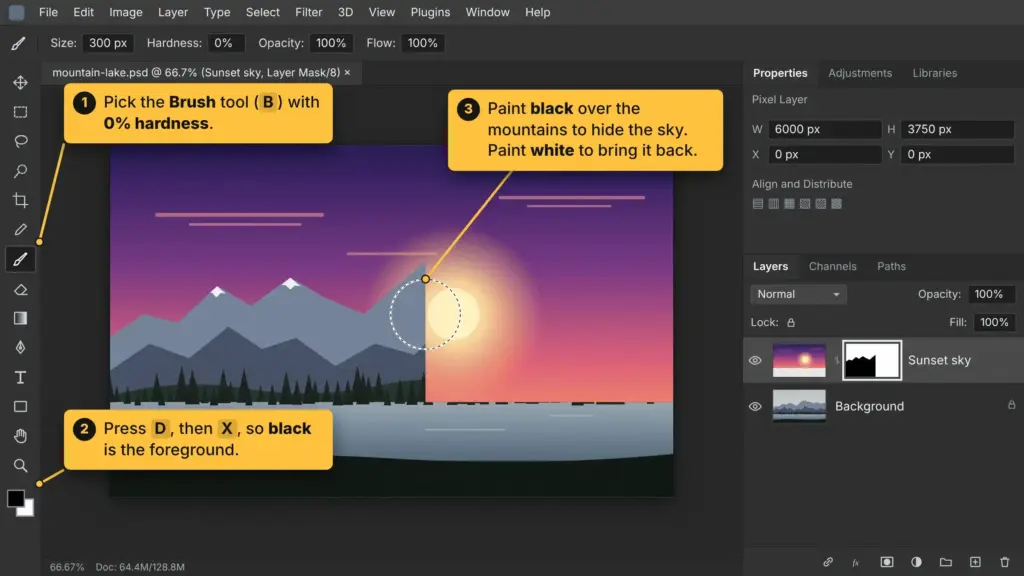
This is where the actual masking happens.
Select the Brush Tool from the toolbar or press B on your keyboard. Before you start painting, make sure the layer mask thumbnail is selected, not the image thumbnail.
Now choose the color you want to paint with:
- Black to hide: Paint over the areas you want to conceal.
- White to reveal: Paint over areas you want to bring back.
- Gray for partial visibility: Use shades of gray when you want an area to appear partially transparent.
For example, if you’re trying to hide the background of a portrait, select black and paint over the unwanted background areas. If you accidentally paint over the subject, switch to white and paint over that part to restore it.
You can press X on your keyboard to quickly switch between black and white.
Take your time with this step. Work around the edges carefully, especially if the subject has fine details such as hair or fur.
Step 5: Refine the Mask
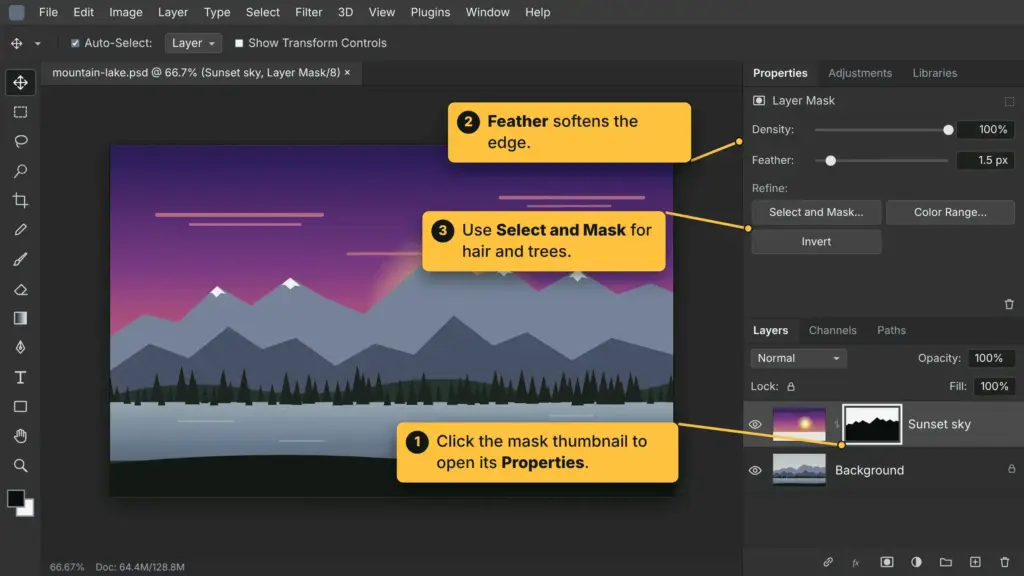
Your first masking attempt may not look perfect, and that’s completely normal. You may notice rough edges, missed areas, or parts of the image that are still visible.
Photoshop gives you several ways to refine your mask.
Here are a few things you can try:
Adjust the brush size: Use a smaller brush when working around fine details and a larger brush for bigger areas.
Change brush hardness: A soft brush creates smoother transitions, while a hard brush produces sharper edges. Choose the one that works best for your image.
Adjust brush opacity: Lower the opacity when you want to make gradual changes instead of hiding or revealing an area completely.
Zoom in: Get closer to the image when working around detailed edges. This helps you spot areas that may need correction.
You can also use the Properties panel to adjust the mask’s Density and Feather settings. Density controls how strongly the mask hides the layer, while Feather softens the mask edges.
Keep making small adjustments until the result looks natural.
You might also like: Long Exposure Photography – Settings & Workflow
Step 6: Save Your Work
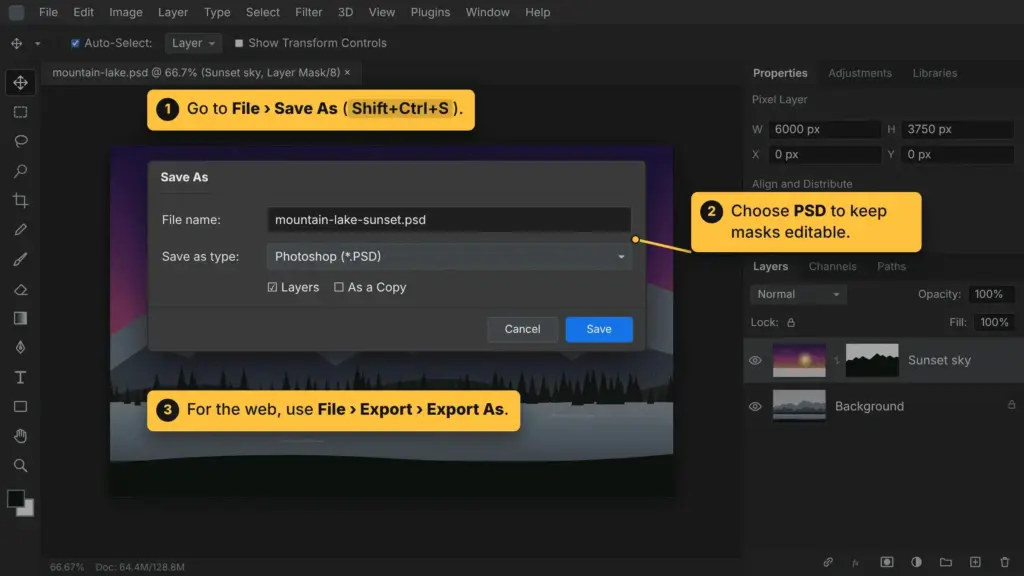
Now that you have completed your mask, you should save your file.
Simply go to File > Save As to save it in the PSD format, which will ensure that your layers and masks remain intact in the future.
If you want to share the finished image, go to File > Export and choose a suitable format, such as JPEG or PNG.
JPEG works well for regular photographs, while PNG is useful when you want to preserve a transparent background.
Remember: Keep an editable PSD copy of your project. It gives you the freedom to revisit your mask whenever you need to make changes.
How to Edit and Refine a Layer Mask
Creating a layer mask is only the beginning. You can continue adjusting it whenever your editing needs change.
Here are a few useful techniques that can help you get more out of your masks.
Invert a Layer Mask
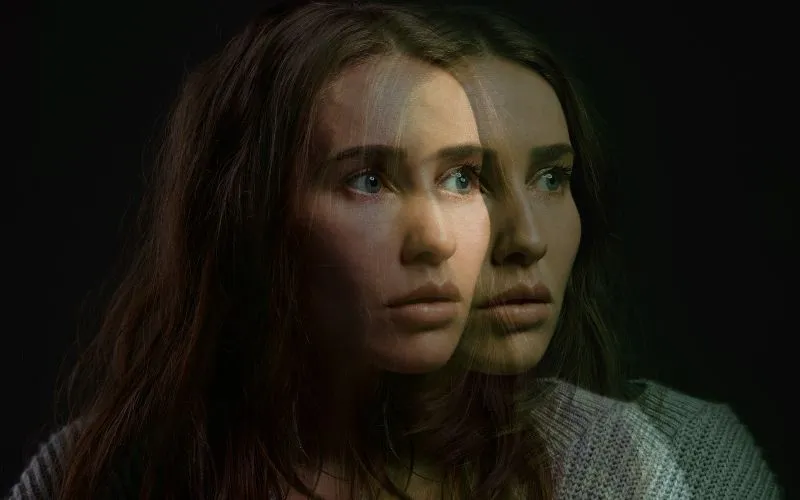
Sometimes you may want to hide the areas that are currently visible and reveal the hidden ones instead. You don’t need to repaint the entire mask to do this.
Simply select the layer mask thumbnail in the Layers panel and press Ctrl + I on Windows or Command + I on Mac.
Photoshop will invert the mask, switching the visible and hidden areas. White becomes black, and black becomes white.
This is particularly useful when you’ve created a selection of the background but actually want to keep the subject visible, or vice versa.
Disable or Delete a Layer Mask
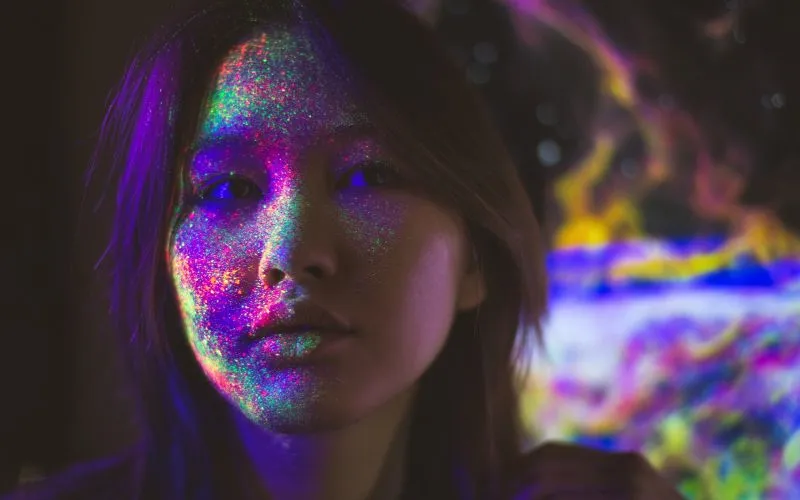
There may be times when you want to compare your original image with the masked version.
To temporarily disable a layer mask, hold Shift and click the mask thumbnail in the Layers panel. A red cross will appear over the thumbnail, showing that the mask is disabled.
To enable it again, Shift-click the thumbnail once more.
If you no longer need the mask, select it and drag its thumbnail to the Delete icon at the bottom of the Layers panel. You can also use the Delete Mask option in the Properties panel.
Remember that deleting a mask without applying it removes the mask while keeping the original layer content.
Also read: What Does RAW Mean in Photography?
Use Gradients on Layer Masks

Gradients are useful when you want to blend two images smoothly.
For example, imagine you’re combining two landscape photographs. One has a beautiful foreground, while the other has a better sky. A gradient on the layer mask can help you blend the two without creating an obvious dividing line.
Here’s how to use one:
- Select the layer mask thumbnail in the Layers panel.
- Choose the Gradient Tool from the toolbar or press G.
- Set your foreground and background colors to black and white.
- Choose a suitable gradient, such as a black-to-white linear gradient.
- Click and drag across the image in the direction you want the transition to appear.
The gradient creates a gradual change in visibility across the mask. You can experiment with different starting points and drag lengths until the blend looks natural.
Refine Difficult Edges
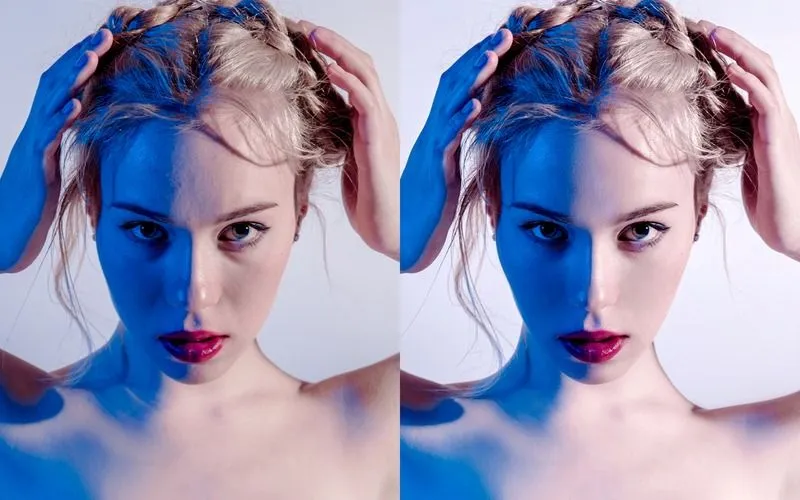
Some parts of an image are harder to mask than others. Hair, fur, feathers, and transparent objects can be tricky because their edges aren’t always clearly defined.
For these situations, Photoshop’s Select and Mask workspace can help.
Start by making a selection around your subject. Then open Select > Select and Mask to access the refinement tools.
You can use the Refine Edge Brush to improve selections around detailed areas such as hair. Adjust the edge settings and preview the result before applying it as a layer mask.
Don’t rush this process. Small adjustments can make a noticeable difference, especially when you’re working with detailed subjects.
Common Photoshop Masking Mistakes to Avoid
Masking takes a little practice. If your first attempt doesn’t look right, a small mistake may be the reason.
Here are some common issues to watch out for:
1. Painting on the image instead of the mask
This is one of the easiest mistakes to make. If you paint directly on the image thumbnail, you may change the actual image pixels instead of controlling their visibility.
Always check that the mask thumbnail is selected before using the Brush Tool.
2. Using the wrong color
Remember the basic rule: black hides, white reveals, and gray creates partial transparency.
If you’re hiding an area when you actually want to reveal it, press X to switch between the foreground and background colors.
3. Creating rough or harsh edges
Using a brush that is too blunt or enormous creates harsh edges on your subject.
Instead, consider using a softer brush, making adjustments to its size, and magnifying the image for precise detail work.
4. Not refining the mask
Your initial cut might forget some important aspects or include unnecessary elements in it. Therefore, you must dedicate some time to reviewing the elements’ edges and clarify possible errors prior to saving the image.
5. Not saving an editable copy
If you only save a flattened JPEG, you won’t be able to edit the original layer mask later.
Save your project as a PSD file so you can return to your work whenever needed.
Also check out: What is Balance in Photography?
Layer Mask vs. Clipping Mask: What’s the Difference?
Layer masks and clipping masks both help control the visibility of image layers, but they work in different ways.
A layer mask uses shades of black, white, and gray to hide or reveal specific parts of a layer. A clipping mask uses the visible content of a base layer to determine which parts of the layer above it appear.
Here’s a quick comparison:
| Feature | Layer Mask | Clipping Mask |
|---|---|---|
| How it works | Uses black, white, and gray to control visibility | Uses the content of a base layer to control visibility |
| Main purpose | Hide or reveal selected areas | Restrict a layer to the shape of another layer |
| Editing method | Paint directly on the mask | Change the base layer or the clipped content |
| Common uses | Background removal, blending, selective editing | Filling text or shapes with photographs and textures |
So, which one should you use?
Choose a layer mask when you want precise control over which parts of an image are visible. Choose a clipping mask when you want one layer to appear only within the boundaries of another.
Both are useful, and knowing when to use each can make your Photoshop workflow much easier.
Final Thoughts
Masking is one of those Photoshop techniques that cover a lot of ground. The more you learn about masking, the better you will become in photo retouching, photo blending, removing backgrounds and other tasks without modifying your original photos.
Start with using simple layer masks and practice hiding and revealing the selected areas first. After that you can move to using clipping masks, vector masks, and gradients.
You don’t have to become proficient in masking right away. A little practice in giving precision to your Photoshop editing can help you achieve a lot in your work.
FAQs
Q.1 What is masking in Photoshop used for?
Ans. Masking in Photoshop is used to hide or reveal specific parts of an image without permanently deleting pixels. It is useful for removing backgrounds, blending photographs, making selective adjustments, and creating creative image composites.
Q. 2 How do I create a layer mask in Photoshop?
Ans. Select the layer you want to edit in the Layers panel. Then click the Add Layer Mask icon at the bottom of the panel. Photoshop will add a white mask thumbnail next to your image layer. You can then use the Brush Tool with black or white to hide or reveal areas.
Q.3 What is the distinction between a layer mask and an eraser tool?
Ans. Utilizing a layer mask means that portions of an image can be concealed without causing the pixels to vanish. The affected spaces can later be recovered. In contrast, the erasing tool obliterates the specific pixels on that layer. So whenever flexibility in editing is desired, it is preferable to use layer masks.
Q.4 How do I remove a background using a layer mask?
Ans. Open your photograph in Photoshop and select the subject using Select Subject or another selection tool. Refine the selection if needed, then click the Add Layer Mask icon. Photoshop will reveal the selected subject and hide the surrounding background. You can use the Brush Tool to correct any areas that need attention.
Q.5 What do black and white mean on a Photoshop layer mask?
Ans. Black hides the parts of a layer, while white keeps them visible. Gray creates partial transparency. You can paint with these colors on the mask to control which areas of your image appear.
Q.6 What is the process of reversing a layer mask in Photoshop?
Ans. You can go to the Layers panel and select the layer mask thumbnail. Then you need to click on Ctrl + I or Command + I keys, depending on whether you are using a computer or a Mac, to reverse the layer mask application.
Q.7 Can I edit a layer mask after saving?
Ans. Yes. If you save your project as a PSD file, Photoshop preserves your layers and masks. You can reopen the file and continue editing the mask whenever you need to. However, if you save only a flattened JPEG or PNG, the original editable mask is not preserved.