Here’s something nobody tells you when you buy your first camera. The camera isn’t really what makes the photo. Light does. The camera just records whatever the light happens to be doing.
That’s why two people can stand in the same spot, with the same gear, and walk away with completely different pictures. One of them noticed the light. The other didn’t.
The good news? Reading light is a skill, not a gift. You can learn it. This guide walks through what photography lighting actually is and how light behaves. Then we get practical, with the lighting styles worth knowing and a simple way to read any scene before you shoot.
Quick Answer: Photography lighting is how light falls on your subject and how you control it to shape the photo. It comes down to four things: whether the light is hard or soft, where it comes from, its color, and how strong it is. Learn to read those, and every photo you take gets better.
Table of contents
- What Is Photography Lighting?
- Why Does Reading Light Matter in Photography?
- 3 Qualities of Light in Photography
- Direction of Light in Photography
- Types of Photography Lighting
- Difference Between High Key & Low Key Lighting
- Which Are The Classic Portrait Lighting Setups
- How to Read Light in Photography: 5 Simple Steps
- Easy Exercises to Practice Reading Light
- Conclusion
- Frequently Asked Questions
What Is Photography Lighting?
Photography lighting is how light falls on your subject, and how you use it to form the final image. That includes light that’s already there, like the sun or a lamp in the corner. It also includes any light you add yourself, such as a flash or a softbox.
Put simply, it’s the difference between a face that looks flat and one that looks three-dimensional. Or a landscape that feels dull versus one that seems to glow.
Every photo has lighting. The real question is whether you chose it or just got lucky.
Why Does Reading Light Matter in Photography?
Most beginners look at the subject. Experienced photographers look at the light hitting the subject. It sounds like a tiny shift, but it changes everything.
Once you can read light, you stop relying on luck. You’ll know why a portrait looks harsh at noon and gorgeous an hour before sunset. You’ll know where to stand, where to put your model, and when to just wait ten minutes for a cloud to drift past.
It saves you a lot of editing too. A well-lit photo needs very little fixing later. A badly lit one can’t really be rescued, no matter how many sliders you push. If your photos feel stuck lately, light is often the missing piece. For the bigger picture, the Lighting & Studio Setup learning path takes you further.
3 Qualities of Light in Photography
Every light source, from the sun to a cheap desk lamp, has a few qualities you can learn to spot. Get comfortable with these three, and you’re already halfway there.
Hard vs Soft Light
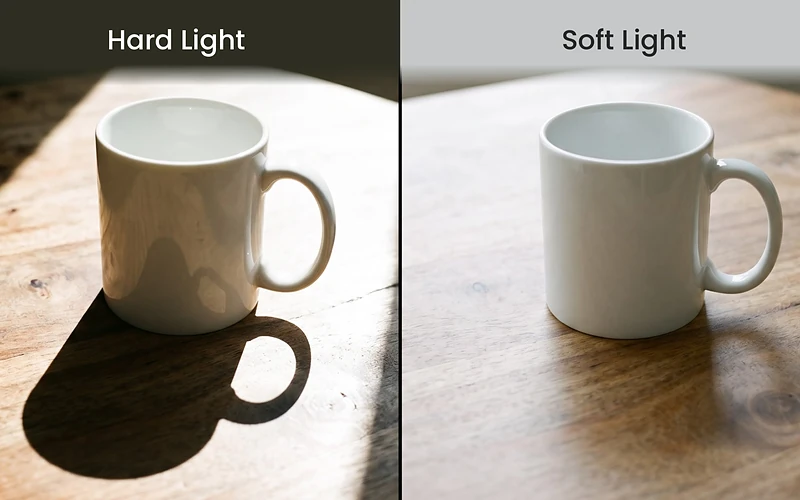
Step outside at noon and look down. See how sharp your shadow is? That is what is called hard light. It comes from a small or distant source. For example, the midday sun or a bare bulb hanging over a kitchen table.
Soft light comes from a large source close to your subject. An overcast sky, a big window, a softbox. Shadows fade gently from light to dark, and skin looks smoother.
Neither one is “better.” Hard light is great for drama and texture, and it works brilliantly in bold street shots. Soft light is the go-to for flattering portraits. The trick is knowing which one you’ve got and using it on purpose.
One handy rule: the bigger the light source compared to your subject, the softer the light. That’s why moving a softbox closer actually makes the light softer, not harsher.
Color Temperature of Light
Light isn’t just white. It has a color, measured in Kelvin. Candlelight and old tungsten bulbs sit somewhere around 2,000 to 3,200K and look orange. Midday sun is roughly 5,500K, which is fairly neutral. Open shade on a sunny day can climb past 7,000K and look surprisingly blue.
Your eyes adjust to all of this automatically. Your camera doesn’t, at least not perfectly. That’s why indoor photos sometimes come out yellow, or snowy scenes turn blue. Setting your white balance fixes it. So does shooting in RAW and correcting it later. New to that? Here’s what RAW means in photography.
Color changes the mood as well. Warm tones feel cozy and a little nostalgic. Cool tones feel calm and quiet, sometimes even lonely. Use that to your advantage.
Intensity of Light
Intensity is just how strong the light is. Bright sun, a dim hallway, the light of a phone screen. It affects your exposure, obviously. But it shapes the mood too.
Here’s the part that surprises people. Light drops off fast as you move away from it. Move your subject from one meter to two meters away from a window, and they get roughly a quarter of the light. Tiny moves make a big difference. So if a portrait looks too dark, try moving closer to the light before you touch your ISO.
Direction of Light in Photography
Where the light comes from matters just as much as what kind it is. It decides where the shadows fall, and shadows are what give a photo depth.
Front Lighting:
The light is behind you, hitting your subject straight on. Everything is evenly lit and easy to expose. The catch is that it can look flat, since there are hardly any shadows to show shape. Pop-up flash is the classic example.
Side Lighting:
Now the light comes from the left or right. One side of your subject is bright, and the other has shadow. In this light, the texture pops and the faces look sculpted. If you only learn one direction, make it this one. A window beside your subject is the easiest way to try it.
Backlighting:
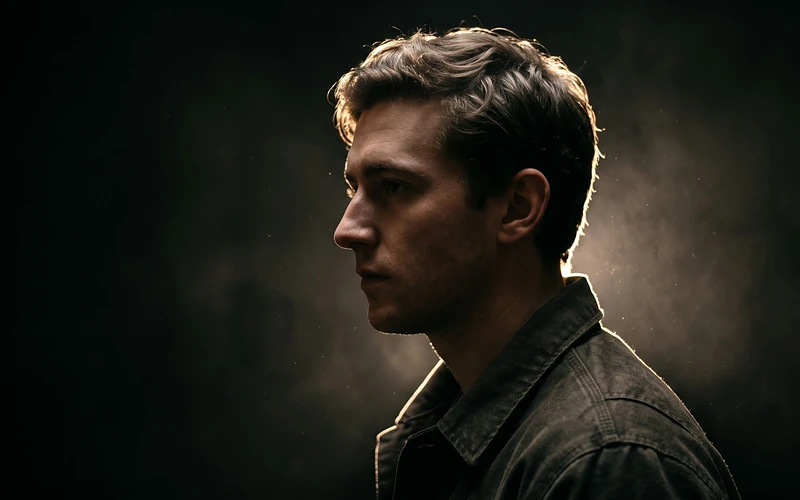
Here the light sits right behind your subject, pointing toward the lens. This is where you get the dreamy glowing hair, a soft haze, and sometimes a bit of lens flare. Expose for your subject’s face, and the background will blow out a little, which usually looks lovely. Expose for the sky instead, and you’ll get a silhouette.
Rim Lighting:
Rim lighting is a type of backlighting where the light just skims the edges of your subject. It leaves a thin bright outline around the hair, shoulders, or profile. It’s brilliant for separating a subject from a dark background. You’ll spot it a lot in moody portraits and product shots.
Types of Photography Lighting
Broadly, every light you’ll ever use falls into one of three groups.
Natural Light Photography
Natural light is anything that comes from the sun. Direct, bounced off a wall, passed through clouds, it all counts. It costs nothing, and it’s everywhere. It also changes constantly.
Golden hour, just after sunrise and before sunset, gives you warm, low, soft light that flatters almost everything. Midday light is harsher and needs more care. Overcast days are honestly underrated, because the whole sky turns into one giant softbox.
Plenty of portrait photographers work almost entirely with natural light. Damien Lovegrove’s Photographing People masterclass is a great look at how a pro does it.
Ambient Light
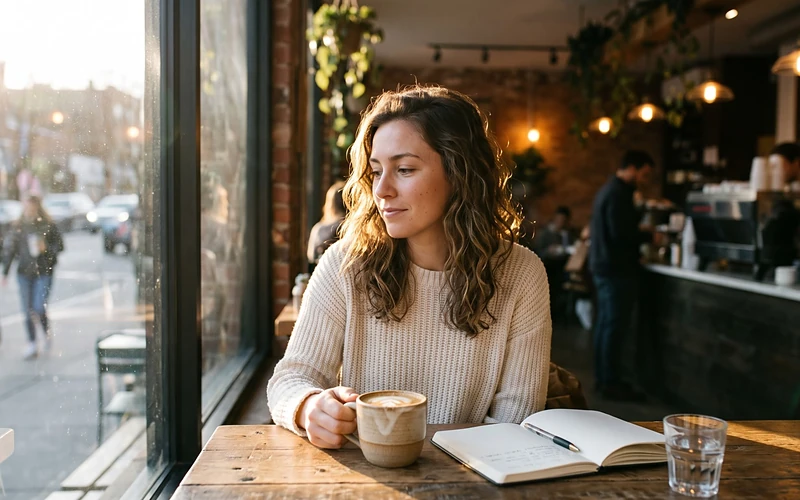
Ambient light is basically whatever light already exists in a scene before you add anything. For example, the streetlights, the warm bulbs in a café, the blue light of a TV. Sometimes it’s natural, and sometimes it isn’t. What matters is that you didn’t bring it.
Learning to work with ambient light makes you faster and flexible. You stop thinking “I need a flash” every time a room gets dim. Instead, you start looking for the best light that’s already there.
Studio Lighting
Studio lighting is light you fully control, usually with strobes or continuous lights and modifiers like softboxes. You decide the direction, the softness, and the strength. Nothing changes unless you change it.
It sounds intimidating, but you don’t need a huge space or a pile of gear. Frank Doorhof’s Lighting Setups That Always Work masterclass shows how to get professional results with one or two lights, even in a small room.
Difference Between High Key & Low Key Lighting
These two terms come up constantly, and they’re easier than they sound. They’re really just about mood.
What Is High Key Lighting?
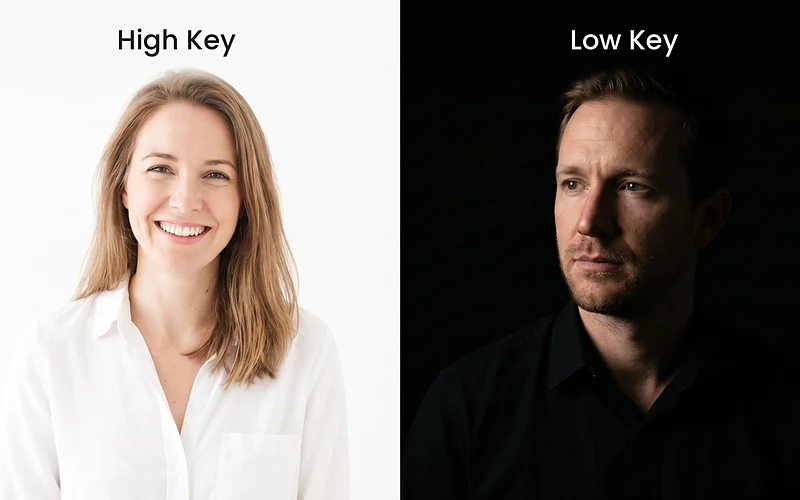
High key lighting is bright, airy, and low in contrast. Shadows are faint or almost gone, and the background is often white. Think baby portraits, skincare ads, or a product sitting on a clean white backdrop. It feels light and fresh, and a little bit happy.
To get the look, you fill the scene with soft light from more than one direction and expose slightly brighter than usual. At home, a white wall and a big window can get you surprisingly close.
What Is Low Key Lighting?
Low key lighting is the complete opposite. In this, most of the frame is dark, with only a few areas lit. Contrast is high, and the mood turns dramatic or mysterious. Picture old film noir, a moody portrait, or a single apple glowing on a black table.
Usually, you’ll use one light placed to the side, and stop it from spilling onto the background. Black and white suits low-key work really well, so our Black & White learning path is a good place to experiment.
Want the full side-by-side breakdown, with setup tips for both? Our guide to high key vs low key lighting goes deeper.
Which Are The Classic Portrait Lighting Setups
Portrait photographers have leaned on the same few lighting patterns for decades, mostly because they just work. Learn to recognize them, and you’ll start spotting them in films, magazines, and ads.
Rembrandt Lighting:
Named after the Dutch painter who loved this look. Place your light about 45 degrees to one side of your subject and a little above their head. On the far cheek, look for a small triangle of light under the eye. That triangle is the giveaway.
Rembrandt lighting feels classic and a bit cinematic.
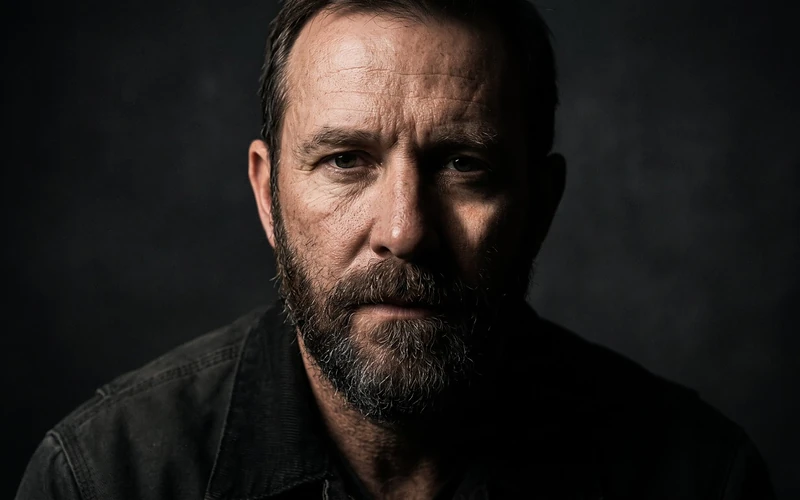
Butterfly Lighting:
Put the light in front of your subject and raise it above their face, angled down. You’ll see a small shadow under the nose, shaped a bit like a butterfly. Cheekbones stand out, and skin looks smooth. No wonder it shows up so much in beauty shots and old Hollywood portraits. A reflector under the chin softens it even more.
Split Lighting:
Move the light to the side, at 90 degrees. When you do this, exactly half the face is lit, and the other half sits in shadow. This looks bold and cinematic. It is great for moody portraits or a strong character look, but less great if your client wants soft and friendly.
For more portrait setups, check out the Studio Lighting Masterclass by Frank Doorhof.
Loop Lighting:
Loop lighting sits somewhere between butterfly and Rembrandt. The light is slightly to one side, around 30 to 45 degrees, and a little above eye level.
The subject’s nose casts a small “loop” of shadow that doesn’t quite touch the cheek shadow.
This light is kind to almost every face, which is probably why so many headshot photographers use it as their default.
How to Read Light in Photography: 5 Simple Steps
This is where it all comes together. Next time you’re about to shoot, run through these five steps. Once it becomes a habit, it takes less than a minute.
Find the Light Source
Ask yourself where the light is actually coming from. The sun? A window? A lamp behind you? Sometimes there’s more than one. Spotting the main source tells you which way the shadows will fall and where your subject should go.
Study the Shadows
Shadows tell you almost everything. Sharp edges mean hard light, and soft, blurry edges mean soft light. Extended shadows mean the light is low, like at golden hour. Short ones mean it’s high overhead. Look at the shadows before anything else.
Check the Catchlights
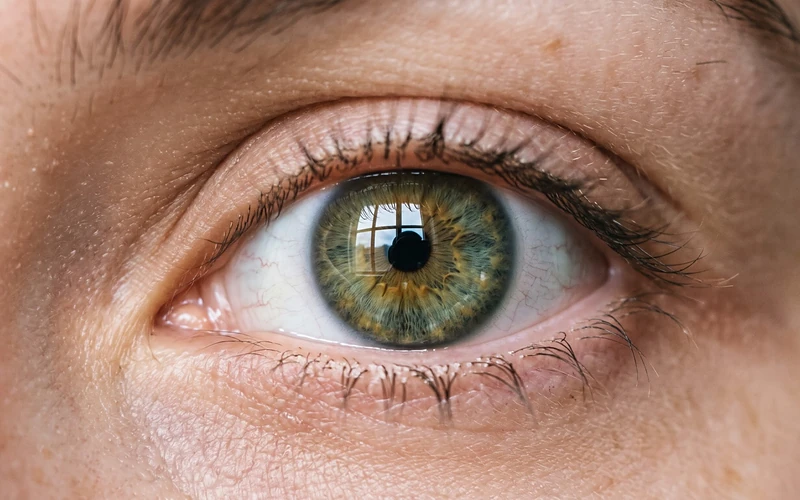
Catchlights are the tiny reflections of the light source in a person’s eyes. They reveal the shape, size, and position of your light. A big soft square usually means a window. A tiny dot means a small, hard source. No catchlights at all? The eyes will look dull, so turn your subject slightly toward the light.
Squint to See Contrast
This one sounds silly, but it works. Squint at the scene until it goes a little blurry. The details disappear, and you’re left with bright areas and dark areas. That’s your contrast. If everything blends into one flat tone, the light is probably flat too.
Read Your Histogram
Your camera’s histogram is a small graph of the tones in your photo. Shadows sit on the left and highlights on the right. If the graph is squashed against the right edge, you’re losing detail in the bright parts. Squashed against the left, you’re losing it in the dark. It’s far more reliable than your screen, especially outside in bright sun.
Easy Exercises to Practice Reading Light
Reading light is like any other skill. You get better by doing it, not just reading about it. Here are a few easy ways to practice:
- Shoot one object all day. Put a mug by a window and photograph it every couple of hours. Watch how the light shifts.
- Walk around your subject. Photograph the same person from the front, the side, and behind. Notice where the silhouettes go.
- Use a single lamp. Light a dark room with one lamp and try to recreate Rembrandt or split lighting.
- Pause a movie. Next time you watch a film, stop on a close-up and guess where the light is coming from.
Want a full plan? Week 2 of our 30-day photography challenge is all about light.
Conclusion
Every photo you’ve ever taken has one thing in common, and it’s not the camera but the light. Once you start paying attention to it, a lot of other things automatically fall into place. Your exposures get more consistent, your portraits stop looking so stiff. And honestly, even the random photos you click start looking professional.
Start small this week. Pay attention to the shadows. Try one window portrait. Look for catchlights. Bit by bit, you’ll start noticing light everywhere you go.
If you’d like feedback on your lighting experiments, share them in PhotoWhoa Studio. Other photographers are always happy to help.
Frequently Asked Questions
1. What Is Photography Lighting in Simple Words?
Ans. It’s how light falls on your subject, and how you use it in your photo. That covers sunlight, lamps, flashes and anything else lighting the scene.
2. What Is Good Lighting for Photography?
Ans. Good lighting suits the mood you’re after. For most portraits, soft light from the side looks the most flattering, like a window or golden hour sun. For drama, a single hard light usually works better.
3. What Is the Difference Between Hard and Soft Light?
Ans. Hard light creates sharp, dark shadows with crisp edges. Soft light creates subtle shadows that fade slowly. The size of the light compared to your subject decides which one you get.
4. What Is Diffused Light in Photography?
Ans. Diffused light has passed through something that spreads it out, like clouds, a white curtain or a softbox. It turns hard light into soft light, so shadows look smoother.
5. What Is a Key Light in Photography?
Ans. The key light is your main light. It’s the strongest one in the scene and sets the overall look. Any other lights, like a fill or rim light, are there to support it.
6. Is Natural Light Better Than Studio Light?
Ans. Neither one wins. Natural light is free and beautiful, but it never sits still. Studio light gives you full control and consistent results. Most photographers end up using both.
7. What Is Off-Camera Flash?
Ans. It’s when you take the flash off your camera and fire it wirelessly or with a cable. Moving the flash to one side gives you much better shadows and shape than firing it straight on.
8. What Is Low Light Photography?
Ans. It’s shooting in low light conditions, like indoors at night, at dusk, or by candlelight. You’ll usually need a wider aperture, a slower shutter, a higher ISO, or a tripod. Outdoors, Gim Liu’s The Art of Long Exposure Photography is great for low light.
9. How Can I Practice Photography Lighting at Home?
Ans. Grab a window and a desk lamp. Photograph a piece of fruit or a mug with the light at different angles. Then add a white card as a reflector and see what changes.
10. Do I Need Expensive Lights to Learn Photography Lighting?
Ans. Not at all. A window, a lamp, and a reflector can teach you nearly everything. Fancy gear helps later on, but comprehending light comes first.