
Are you looking for an easy way to create a free Photography website? Building a photography website is an excellent idea to show your camera skills, connect with your customers, promote your online presence, and much more.
Whether you are a beginner wildlife photographer or an established wedding photographer, having a photography website is essential in today’s digital world. In this article, we’ll help you create a free WordPress photography website.
Table Of Contents – Creating a Photography Website For Free
WordPress – The Best Free Website Builder For Photographers
WordPress is a known content management system (CMS) with a user-friendly interface that makes it easy for people to build and manage their websites. Photographers, bloggers, well-known companies, and even some of the largest brands in the world trust WordPress.
WordPress is designed with SEO in mind, making it easier for websites to rank on search engines like Google. WordPress also offers a wide range of plugins, themes, and templates for optimizing the website for the best search engine results.
If you think WordPress is expensive, think again. WordPress is an open-source content management system that is completely free to use. According to Cybernews, WordPress remains one of the most reliable and cost-effective website-building platforms available, making it an excellent choice for photographers looking to establish a professional online presence.
For these reasons and many more, WordPress continues to be recognized as a trustworthy platform for creating and managing websites of all sizes.
Here are the top reasons why WordPress is the best platform for making a website
- Ease of Use: WordPress is user-friendly and suitable for all levels of expertise.
- SEO Friendly: It offers a wide range of SEO themes, plugins, and features that help improve website visibility and search engine rankings, enabling effective digital marketing strategies.
- Customization: With a vast library of themes and plugins, WordPress enables customization to tailor websites to specific design and functional requirements, whether they’re blogs, e-commerce sites, or any other type of web project.
- Scalability: WordPress can easily scale to meet the needs of various websites, from small personal blogs to large corporate sites, allowing for growth and expansion.
- Mobile Responsiveness: The platform ensures that websites are mobile-responsive and automatically adapts to various screen sizes, which is crucial for providing a consistent user experience on smartphones and tablets.
- Multilingual Support: WordPress offers plugins and features that make creating and managing multilingual content easier, making it a valuable choice for reaching a global audience.
- Performance Optimization: It provides tools, plugins, and best practices for optimizing website performance and enhancing speed and efficiency, essential for user satisfaction and SEO rankings.
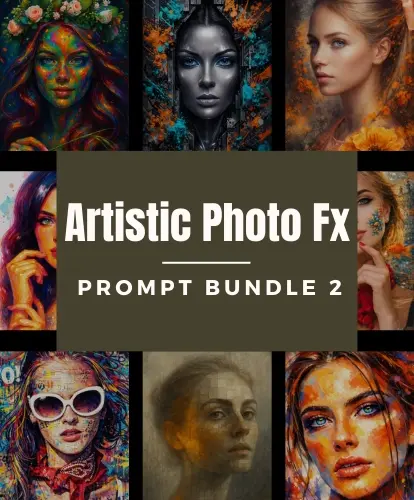
Get your hands on these amazing photography deals to enhance your photography:
How To Create a Free Photography Website on WordPress
Now that you understand the benefits of using WordPress for your photography website, let’s dive into the step-by-step process of creating it.
Step 1: Pick a Domain Name and Hosting Provider

The first step in creating a photography website is choosing a domain name—the web address that visitors will type into their browsers to reach your site and a hosting provider.
Domain names are unique addresses used to locate websites and resources online. They majorly impact search engine rankings and visibility based on the name you’ve provided and how close it is to the website’s content.
Your domain name must be distinctive and must accurately represent your brand.
Numerous hosting options are available when it comes to choosing a provider. We advise considering Kinsta for its reliability, speed, security, and customer support.
Why Should You Consider The Kinsta Hosting Provider?
- Kinsta offers high-speed Google Cloud hosting, ensuring your website loads quickly.
- You can focus on creating content since Kinsta handles all the technical issues.
- Kinsta provides DDoS protection (distributed denial of service) and ongoing website security monitoring.
- Their personalized dashboard provides accessibility to website management.
- Your data is safe with routine backups and easy restore options.
- Staging environments for testing and development without interfering with your live website.
Step 2: Install WordPress
Once you’ve registered with the domain hosting provider, you can install WordPress. Many hosting companies, including Kinsta, allow WordPress installations, making the process simple.
Step 3: Select a Theme to Create a Photography Website
Now that you’ve downloaded your WordPress website, the next step is to choose and install a theme.
We’ll install the Cyberchimps responsive theme as it’s quick, efficient, and provides specific features that other themes don’t.
Features of Cyberchimps Responsive Theme:
- Responsive Starter Templates: Responsive Starter Templates plugin offers a collection of 150+ professional Elementor and Block templates. You can choose, import it, and create your website with just a few clicks.
- SEO-optimized: The theme is SEO-optimized, which will help you rank your website on top of Google SERP.
- Responsive Elementor Addons: REA gives over 50 diverse widgets you can use with Elementor page builder to create a unique website.
- Integration with Popular Plugins: This plugin is compatible with all widely used plugins, including MailChimp, WP Legal Pages Pro, WooCommerce, Yoast, WP Forms, Contact Form 7, and others.
With these incredible features, let’s go to WordPress and install Responsive Theme.
How To Install Themes on WordPress
Open your WordPress dashboard and click on Appearance > Themes.
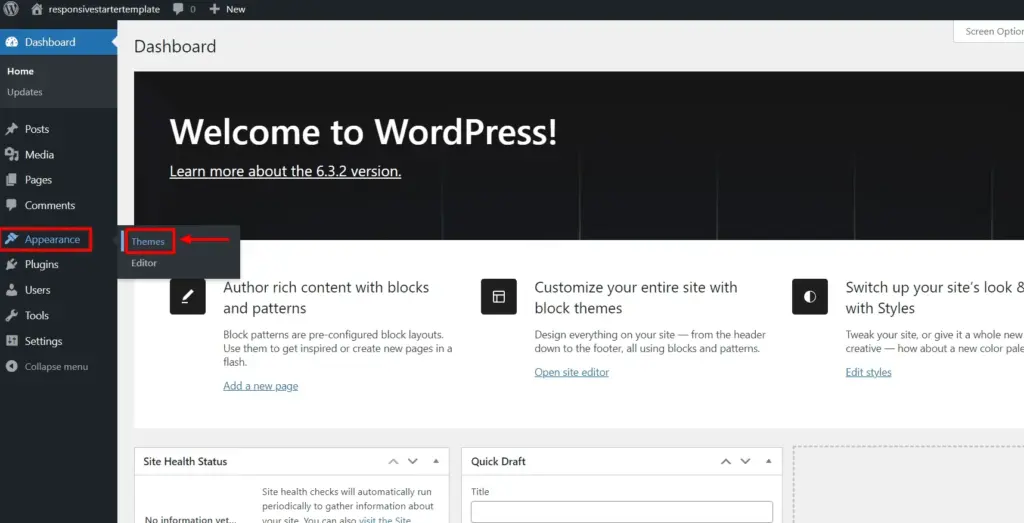
Click on the Add New button.

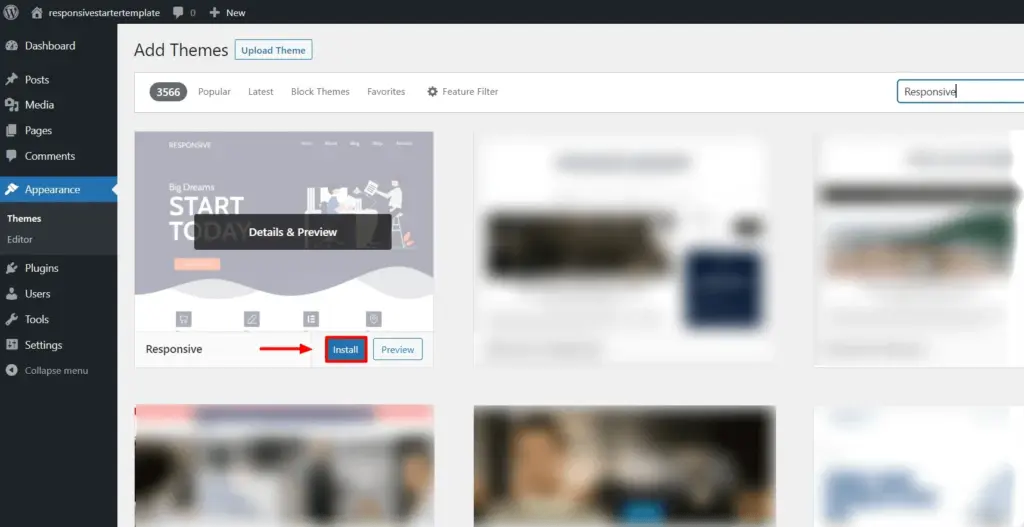
In the search bar, type Responsive.
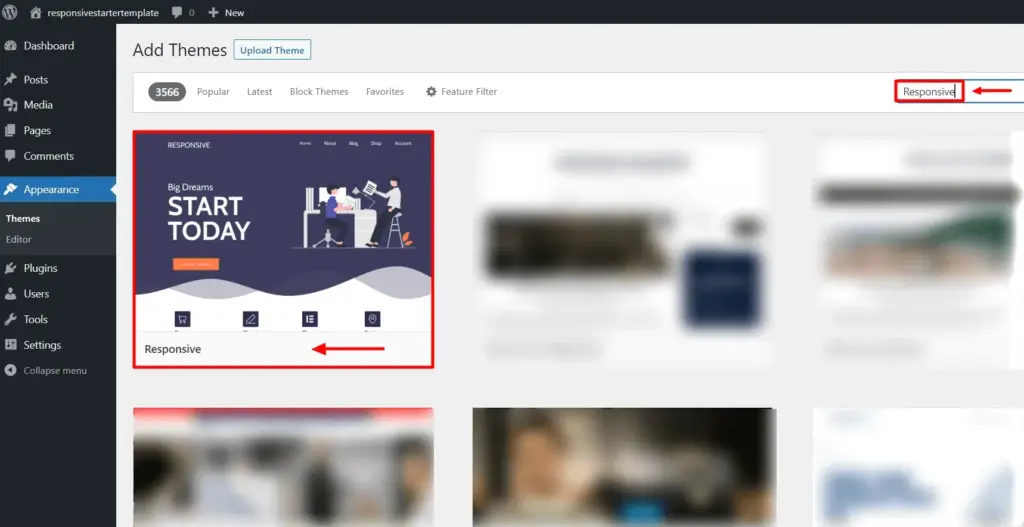
Hover over to the Responsive theme and click the Install button.
To activate the plugin, click on the Activate button.
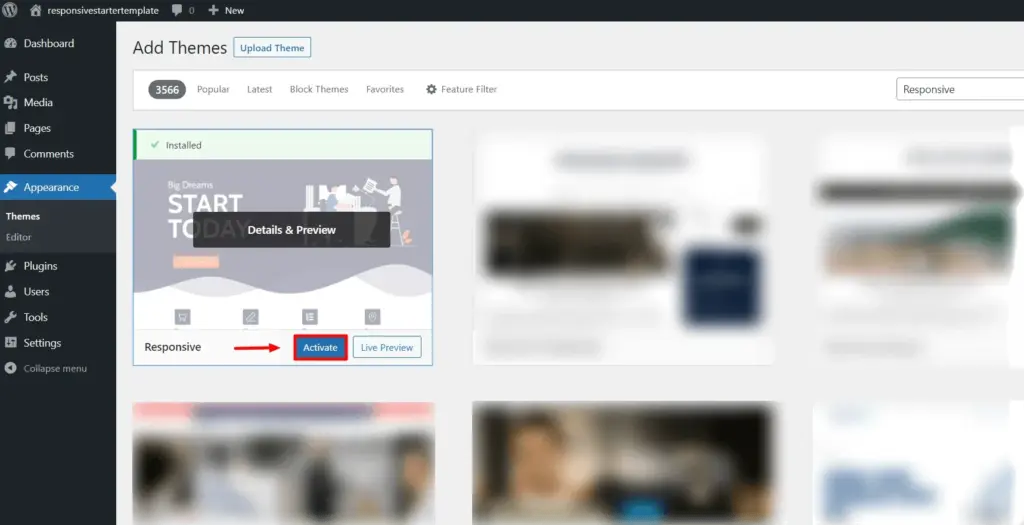
That’s it; you’ve installed and activated the Responsive theme. To access the 150+ templates, we’ll need to install the Responsive Starter Templates plugin.
Let’s check out how to install the plugin in the next section.
Step 4: Install Responsive Starter Templates Plugin
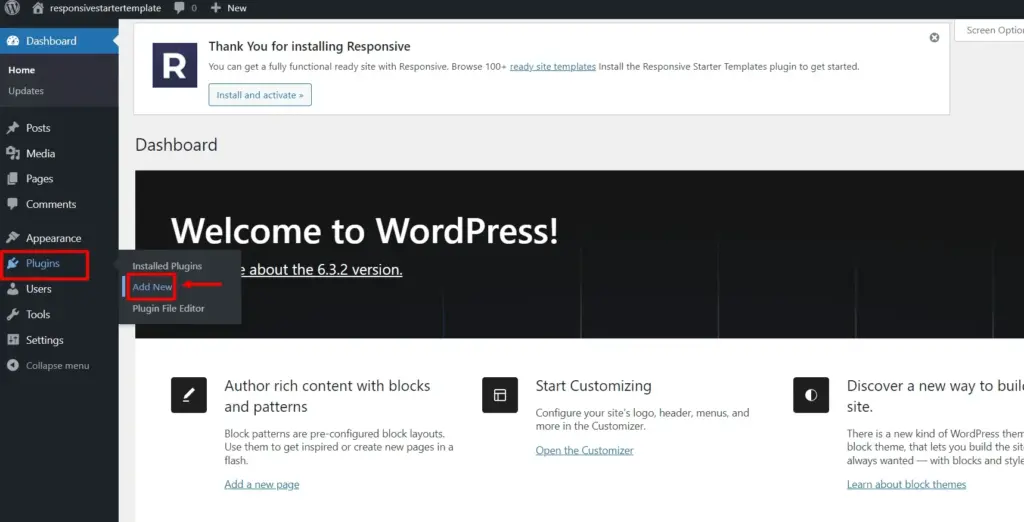
After activating the Responsive theme, download the Responsive Starter Templates plugin to access 150+ starter templates.
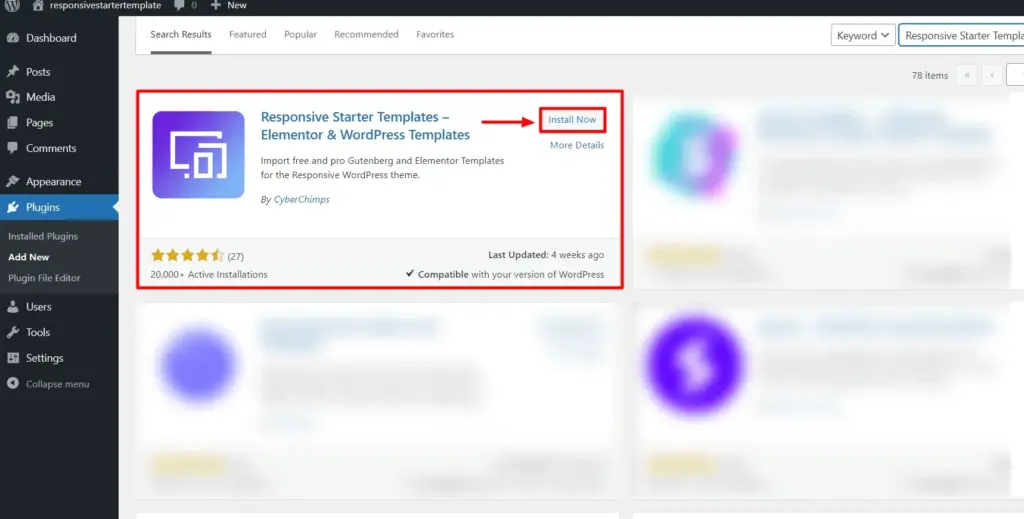
From your WordPress dashboard, select Plugins and click on the Add New button.
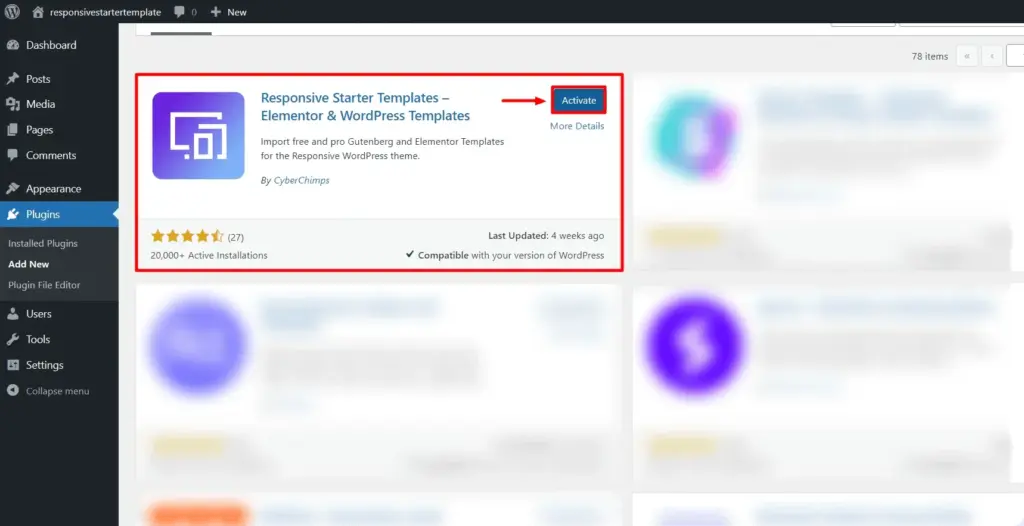
Search for Responsive Starter Templates in the search bar and click the Install Now button.
Once the plugin is installed, click the Activate button.
Step 5: Install WordPress Templates For Photographers
Now that we have installed the Responsive Starter Templates plugin, let’s learn how to import the Photography Template to build our website.
From your WordPress dashboard, hover over the Responsive button and click the Responsive Templates menu.
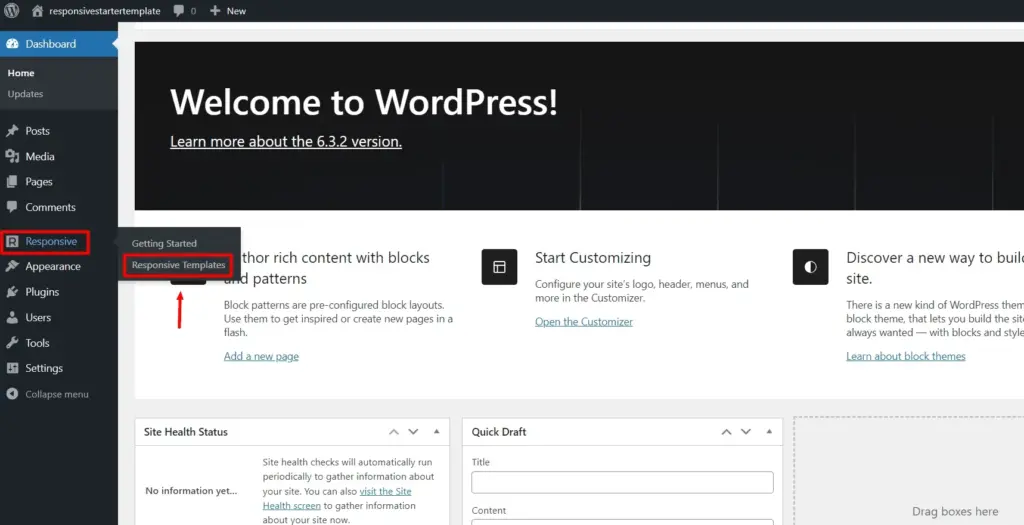
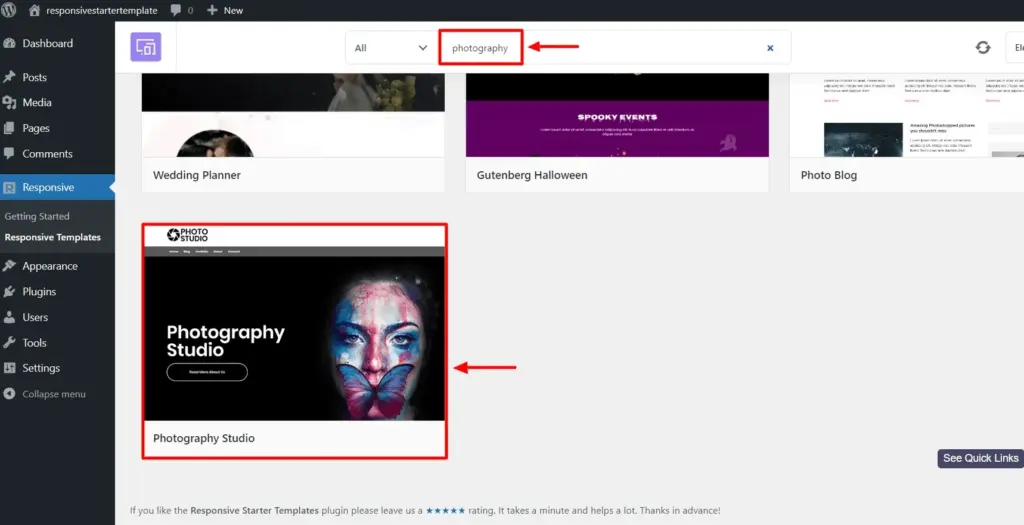
In the search bar, search for Photography and click on Photography studio template.
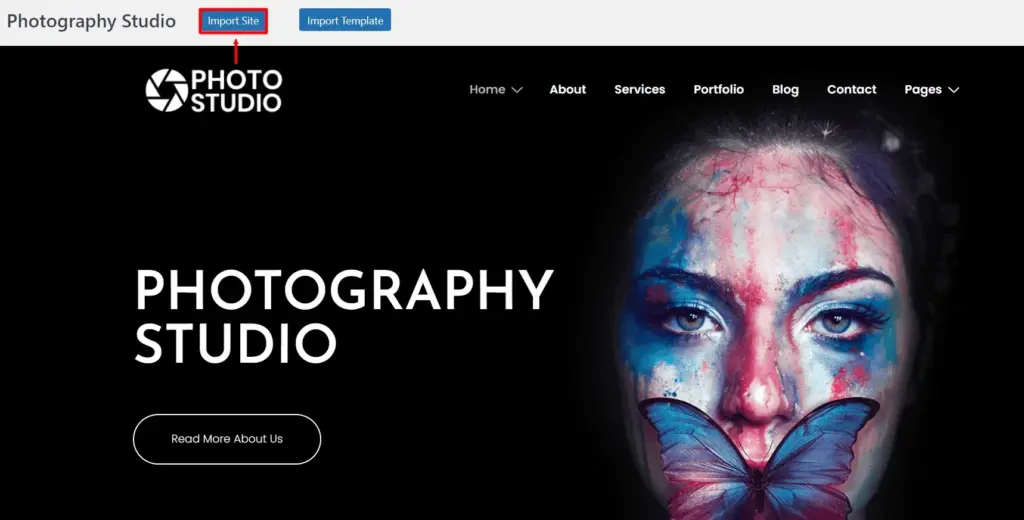
Now click the Import Site button.
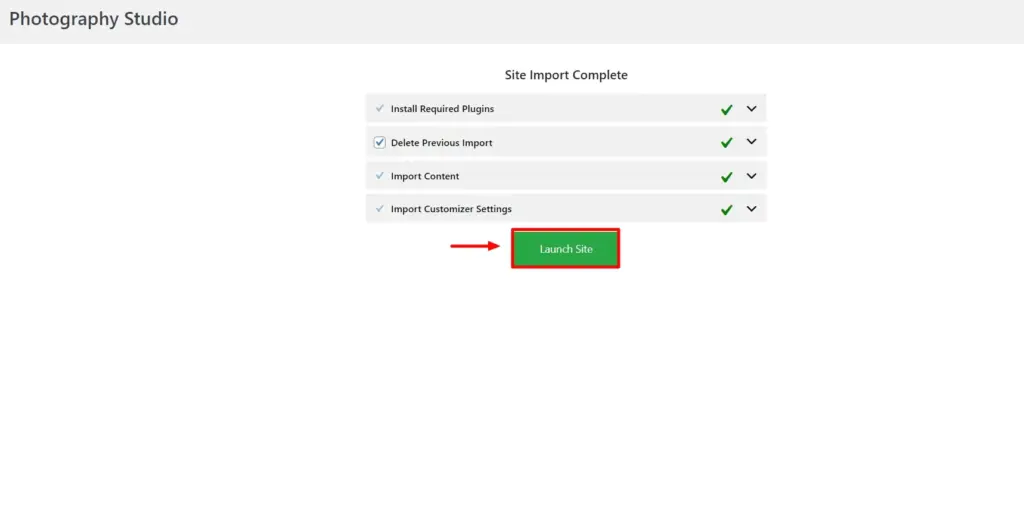
Once the site is imported, click on Launch Site.
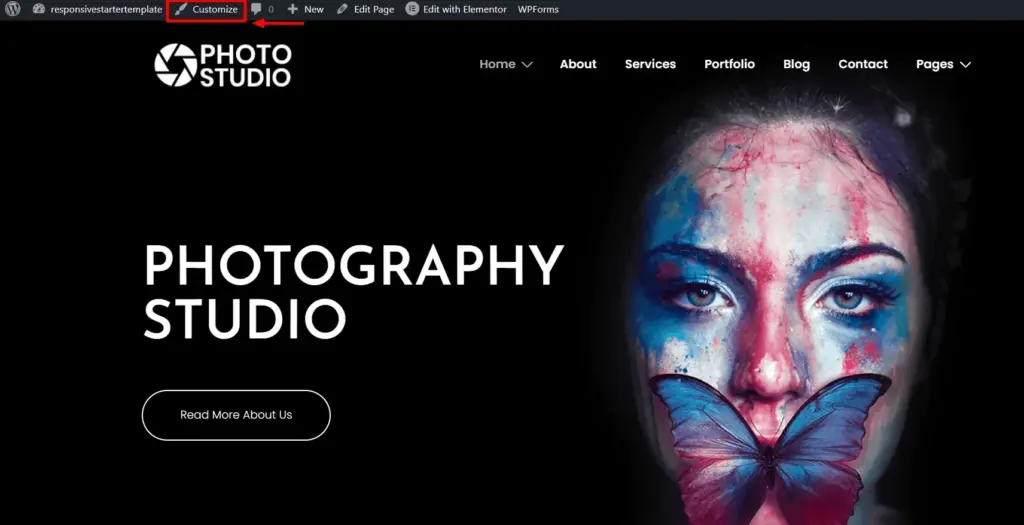
Step 6: Edit your Header and Footer with Theme Customizer
Now that you’ve launched your website, you can customize its header and footer using different settings.
Click on the Customize button to edit.
From the different menu options that you see, click on the Header menu.
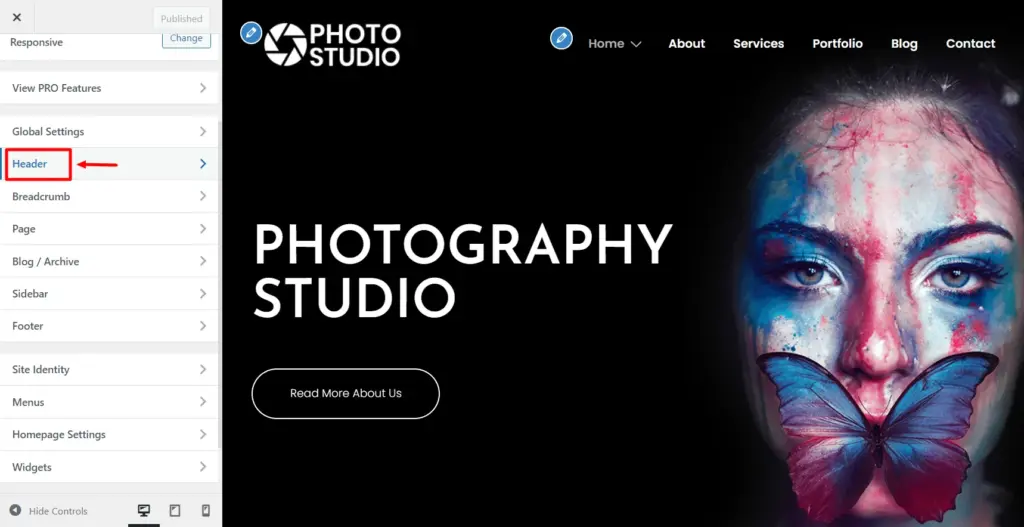
Inside the header menu, there are multiple customizer options for the website’s header.

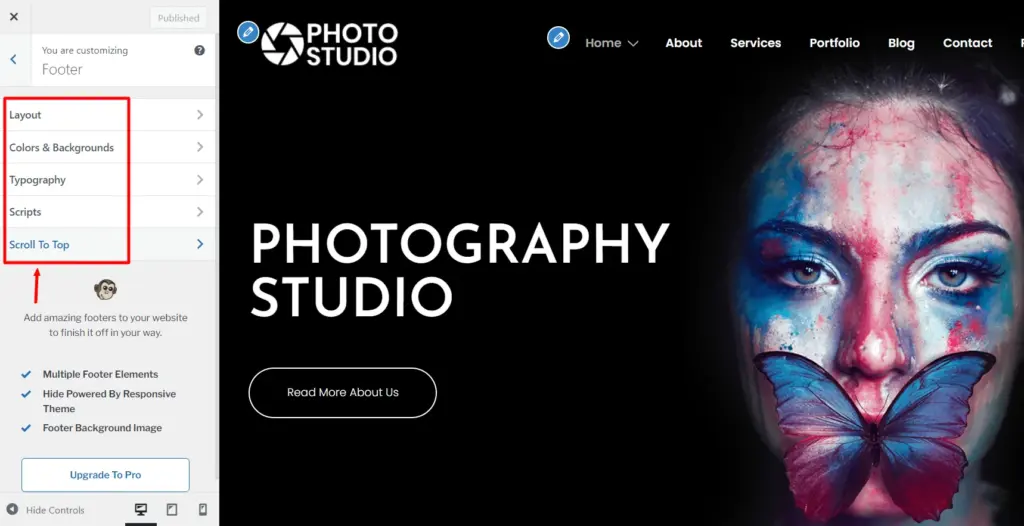
To customize the Footer, click on the Footer menu.
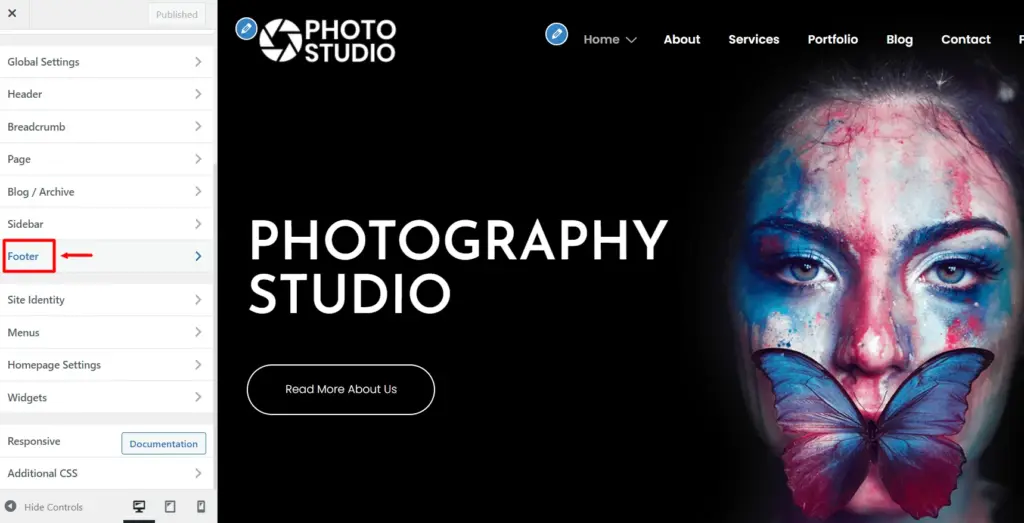
From the various customization options available in the Footer section, you can explore and make changes to the ones ideal for you.
Step 7: Edit Your Content with Elementor.
After you have customized the header and footer, it’s time to edit your website’s main content.
You need to follow the following steps to do this.
First, click on Edit with Elementor.
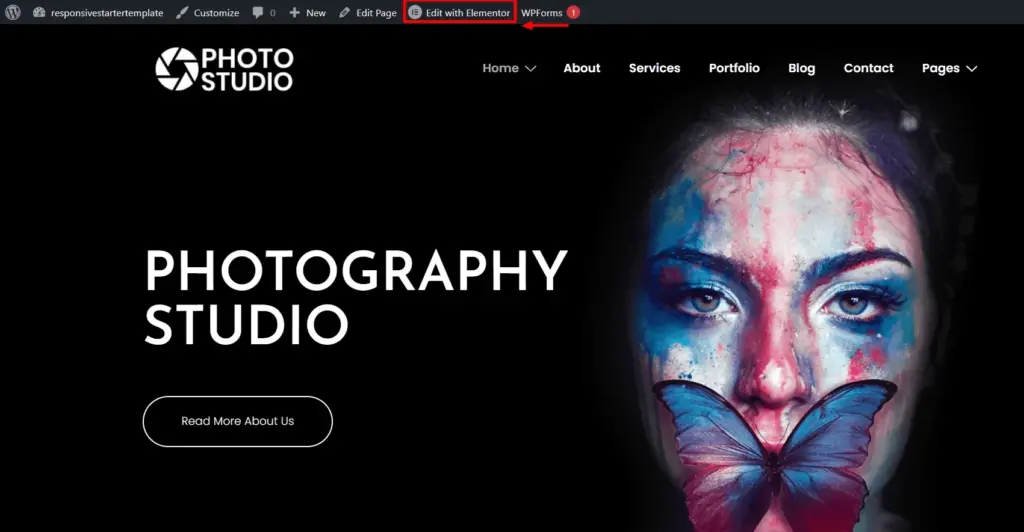
You will get a variety of widgets to customize your website.
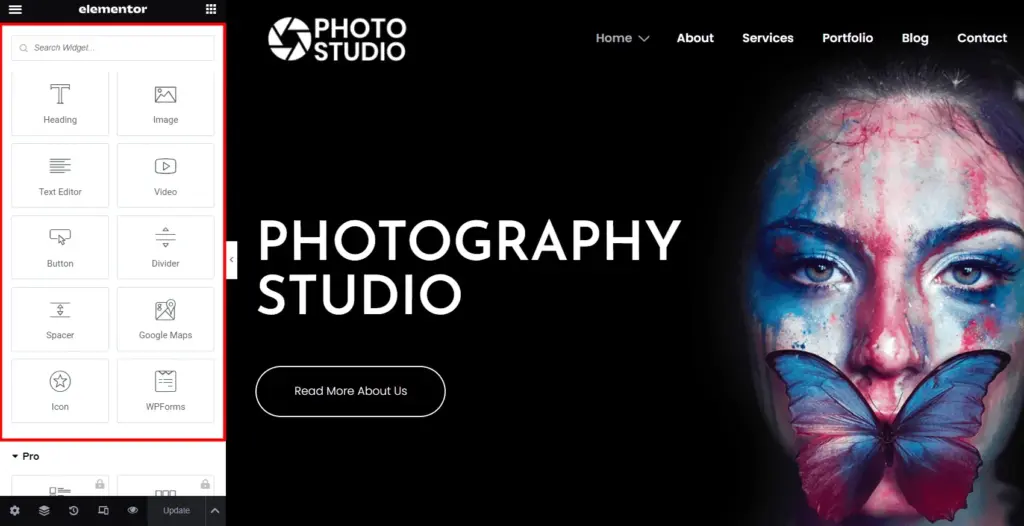
Select from various widgets, such as heading, image, video, button, and several other options, to make your website attractive.
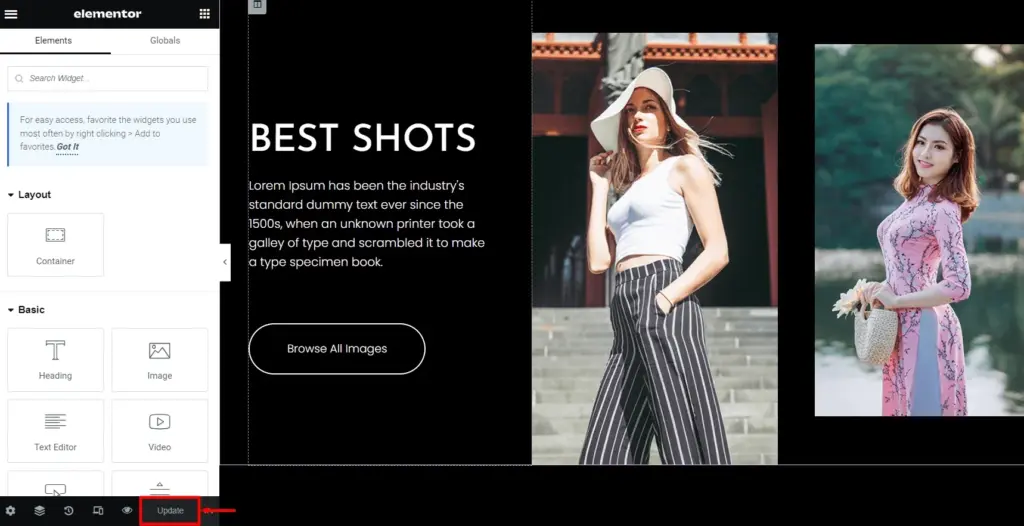
Step 8: Publish Your Photography Website
After creating your website’s content, click on Update. Your Photography website is now live with the changes you’ve made.
That’s it! You have successfully built a stunning Photography website.
Must-Have Plugins for WordPress Website
You can install these essential plugins for better functionality and performance of your photography website.
- Yoast SEO: This plugin is advised as it helps to enhance your website’s search engine optimization and, therefore, increase its visibility on search engines.
- Smush: If you want to compress and optimize your photos for quicker loading, consider installing Smush.
- W3 Total Cache: This plugin helps store cache, improving website speed. This is one of the must have plugins for WordPress.
- NextGEN Gallery: NextGEN Gallery is the ideal plugin for building beautiful image galleries and albums for your portfolio
- Contact Form 7, IvyForms, or WPForms: This tool allows users to effortlessly design personalized contact forms that allow them to communicate seamlessly with their audience.
Promoting Your Photography Website
Having a photography website is a significant step in starting your career.
Promoting your free WordPress photography website is crucial for expanding your reach and showcasing your work. Here are some effective strategies:
- Social Media Marketing: Utilize platforms like Instagram, Facebook, and Twitter to share your Photography. Use relevant hashtags and post regularly. Partnering with UGC content creators from UK or US can help you tap into established audiences and build credibility fast.
- Blogging: Create a photography blog on your website to engage your audience and boost SEO.
- Email Marketing: Build an email marketing list and send updates, newsletters, or exclusive offers. Check out email design trends to stand out.
- Photography Website SEO: Optimize your photography website for search engines using descriptive alt tags for images and quality content.
- Online Photography Portfolios: Showcase your work on platforms like 500px, Behance, or Flickr.
- Networking: Attend photography events and join online communities.
- Guest Posting: Write for photography blogs with a link to your website.
- Online Advertising: Consider paid ads on Google Ads or social media to target specific demographics. Use tools like the ads library to review what other creators are running, and pair that with media-monitoring platforms such as Cision to keep an eye on competitor activity so you can refine your strategy and stand out.
- Word of Mouth: Encourage satisfied clients to recommend your services and website.
- Participate in Contests: Enter your work into photography contests for exposure.
- Online Photography Directories: List your website on photography directories and local business listings.
- Offline Marketing: Use traditional methods like business cards and local advertising.
- Monitor Analytics: Regularly review website analytics to fine-tune your strategies.
Applying these strategies will help you attract more visitors to your free WordPress photography website and help you reach a broader audience.
Checkout the Best Paid Website Builders to Create your Photography Website
Conclusion – Create a Free Photography Website
Now that you have a basic idea of how to create a free photography website, it’s time to get started and create a real-time webpage.
To build a successful Photography website, you must select a theme that is excellent in performance, best in support, and aesthetically pleasing. We recommend using Cyberchimps’ Responsive theme.
You can create your photography website in minutes with a hosting company like Kinsta and a fantastic theme like Responsive.
If you’ve enjoyed this article, explore our other related articles.
- Websites To Find The Best Online Photography Courses
- A Photographer’s Lightroom Presets Guide
- Portrait Photography Vs. Landscape Photography: Which Is More Captivating?
- Download amazing photography freebies instantly.
Are you excited to make your photography website? Check out this Responsive WordPress theme to create a spectacular and user-friendly website!


One Comment on “How To Create a Free Photography Website”
This page truly has all the info I needed about this subject
and didn’t know who to ask.