For photographers, Lightroom keyboard shortcuts are essential for efficient editing, saving time, and boosting creativity. Learning Lightroom shortcuts can revolutionise your workflow, regardless of your level of experience.
We’ll cover 25 essential shortcuts, along with their applications and memorisation advice. You’ll have a strong understanding of Lightroom hotkeys and Lightroom keyboard shortcuts, boosting your productivity significantly.
Table of contents
- Why Photographers Should Use Lightroom Shortcuts
- 1. Lightroom Shortcut Keys For Navigation & Viewing
- 2. Lightroom Shortcuts For Editing
- 3. Photo Rating & Organisation Lightroom Keyboard Shortcuts
- 4. Workflow & Export Lightroom Shortcuts
- Tips For Memorising Lightroom Shortcuts
- Conclusion
- Frequently Asked Questions
Why Photographers Should Use Lightroom Shortcuts
It’s important to understand the importance of the Lightroom hotkeys before exploring the shortcuts themselves. They speed up editing, saving time by reducing tedious mouse clicks with large photo libraries.
Additionally, the strain of constantly switching between the mouse and keyboard is reduced when using shortcut keys. Using shortcuts keeps you focused on editing rather than navigating menus, helping you maintain your creative flow.
There are a variety of shortcuts, but it is not possible to remember and use them all for editing. Here are 25 Adobe Lightroom shortcuts most commonly used by professional photographers.
1. Lightroom Shortcut Keys For Navigation & Viewing
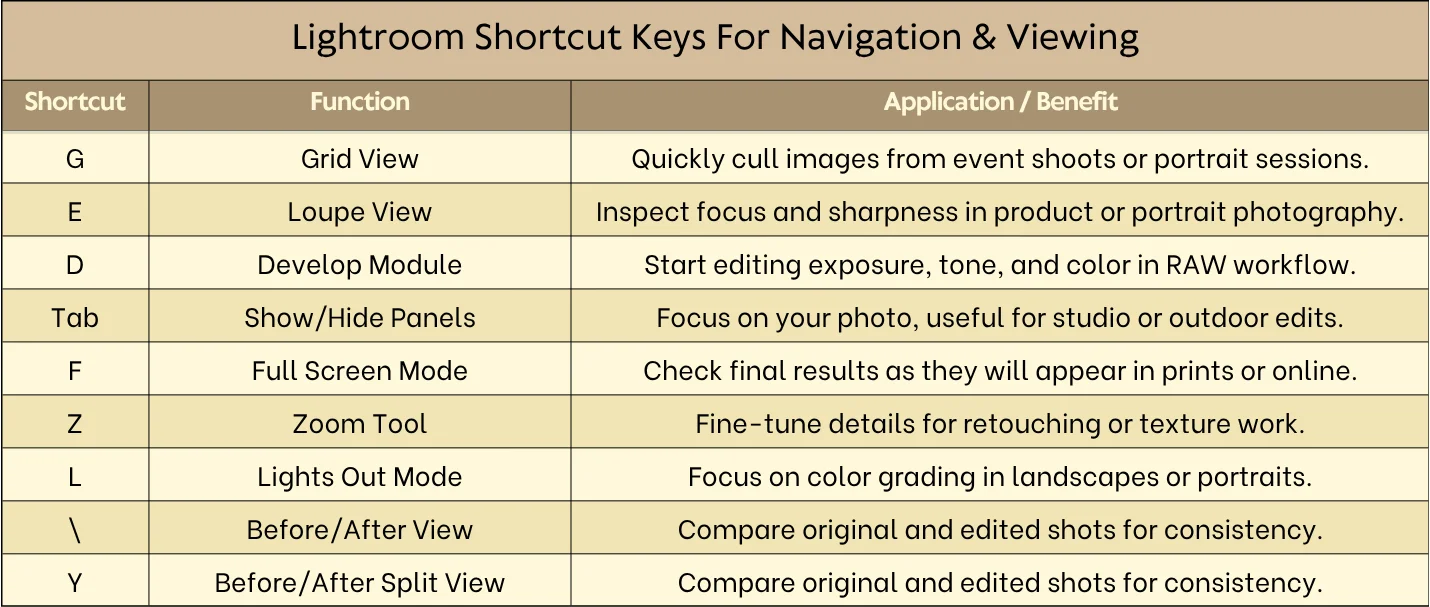
Grid View (G)
To switch to Grid View in the Library module, press G. When you need to browse hundreds of photos quickly, this shortcut is very helpful.
Selecting the best frames is simple with Grid View. It lets you see everything in a clear layout, whether you’re editing travel or portrait photos.
Many photographers use this shortcut to expedite the culling process without having to use their mouse continuously.
Loupe View
You can toggle immediately between Grid View and Loupe View by pressing E. In this mode, one image is displayed in an enlarged view. This allows you to quickly check its quality, brightness, and other fine details.
The Loupe View is also quite handy when zooming through thumbnails, as it provides a better view than the small previews.
Thus, it is a quick way to see your photos and decide which ones to keep or discard.
Also Check Out: Masterclass: New Lightroom Features Workflow By Dan Hecho
Develop Module (D)
To open the Develop Module directly, press D. Exposure, colour balance, and general tone are among the parameters you can set here. If you typically need to batch quickly, adjust a series of images from a portraiture or commercial session.
This one-click access to the Develop Module will save you time and help you stay in your creative flow. It functionally makes the switch from browsing to editing instant and effortless.
Show/Hide Panels (Tab)
If you want to create a clean workspace and reduce distractions. This helps you concentrate solely on your photo; you can hide or show all side panels by pressing Tab.
Many photographers use this shortcut when editing on a small screen to make the most of their screen space. Additionally, it is quite convenient to compare the changes made when hiding panels.
Also Check Out: Secrets & Features of Lightroom & Photoshop By Dan Hecho
Full Screen Mode (F)
Press F to get a full-screen view. Where you get rid of menus and panels, you can concentrate only on the photo.
This is very useful if you review the most recent changes made to wedding or event pictures before delivering them to the customer. In full-screen mode, you can experience the photo just like in print or online galleries.
Zoom Tool (Z)
For examining a photo in detail, press Z to zoom in and out. This is crucial for verifying minute details in product photography for online sales or portrait retouching.
By zooming in, you can see dust, textures, and flaws without ever leaving Lightroom. This shortcut improves the speed and accuracy of precision editing.
Also Check Out: Luminar Neo Ultimate Editing Guide
Lights Out Mode (L)
Press L to make the background completely dark. Double-click L. Everything will become darker as a result, except your photo.
By highlighting your image, this feature facilitates exposure and colour grading. It helps landscape photographers check for tonal balance or studio photographers assess lighting.
Before/After View (\)
By pressing \, you can toggle between the edited and original image.
As such, you can check your changes against the original. Whether they have the desired effect on brightness, colour, and exposure.
When making adjustments to a face or trying to get the right colours in a trip photo, this shortcut gives you a more natural look.
Also Check Out: 1000+ Extravagant Lightroom Presets Bundle
Before/After Split View (Y)
To access a side-by-side comparison of the original and edited photo, press Y. This feature is perfect for rectified subtle product photos or for the precise detailing of landscape photos.
Split View lets you evaluate whether your modifications bring the image to life without compromising its authenticity. Professionals in image retouching commonly use it for quick, efficient work.
2. Lightroom Shortcuts For Editing
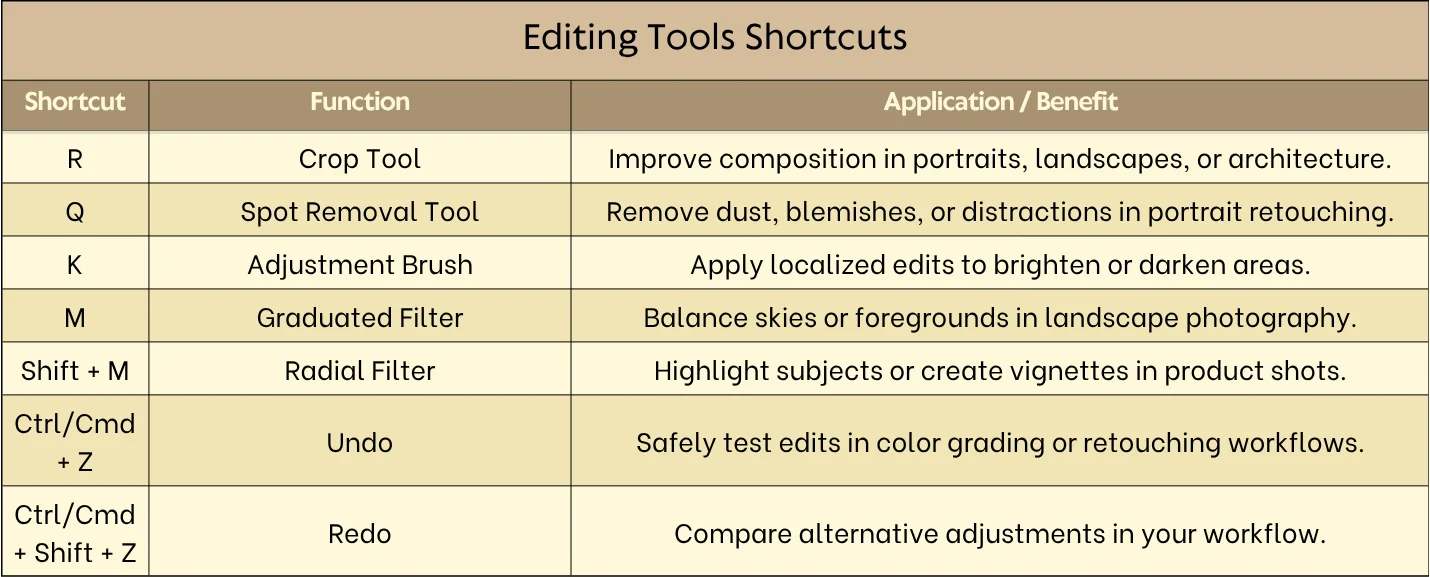
Crop Tool (R)
Press R to turn on the Crop Tool. Cropping enhances the image’s main idea and gets rid of any unwanted parts around the edges of your frame.
Cropping is a ‘must-have’ for portraiture. It is basically the subject’s face that you have to frame or for building pictures that need to be ‘upright’. With this shortcut, you fast crop just as you would be editing, but without any editing flow break.
Also Check Out: 60 Lightroom Mobile Presets For Bloggers
Spot Removal Tool (Q)
Remove dust spots, blemishes, or distractions by pressing Q. In product photography, this tool is important when clean images are needed or in portrait photography for skin retouching.
It avoids the trouble of manual Photoshop editing for small imperfections. Therefore, quick access makes your work faster and more uniform throughout your photo library.
Adjustment Brush (K)
Selective edits can be done on specific areas by pressing K. Local exposure adjustment, burning, and dodging are the proper uses of this tool.
Portrait photographers can use it to soften facial features while nature photographers can make the sky more attractive. Working this key deeply gives you the ability to make exact corrections while still steering the overall picture.
Also Check Out: The Ultimate Photography Composition Course
Graduated Filter (M)
By pressing M, you can add gradient variations. Essentially, this lightroom shortcut is used to blend the sky or earth in the landscape harmoniously.
Additionally, the function adjusts the balance perfectly in an interior lighting shot of a real estate listing. Quick access to the Graduated Filter facilitates and ensures the same results.
Radial Filter (Shift + M)
Using Shift + M you can create a circular or elliptical area of adjustment. It can be used to add light to the subject, deepen the vignette, or simply direct the viewer’s focus to the key area.
In Portrait photography, the photographer lights the subject’s eyes, and in product photography. In this type the product is emphasised, this feature can be used. This lightroom keyboard shortcut helps you reach the exact position without extra movements.
Also Check Out: 290+ Amazing AI Presets For Lightroom
Undo (Ctrl/Cmd + Z)
Experimenting with color grading, exposure, or cropping is much easier and safer if you use Ctrl + Z (Windows) or Cmd + Z (Mac) to undo your last move.
The Undo function is most commonly used in retouching workflows, as photographers test multiple edits. It allows creative exploration which is a fundamental step in the process of making mistakes.
Redo (Ctrl/Cmd + Shift + Z)
Through Redo, an undone action can be directly reversed. Pressing the key combination for Re-do lets you quickly switch between different editing versions.
These Lightroom keyboard shortcuts are handy when wedding photographers are making tonal adjustments and need to choose among various versions. Redo allows your workflow to go seamlessly without jams.
3. Photo Rating & Organisation Lightroom Keyboard Shortcuts
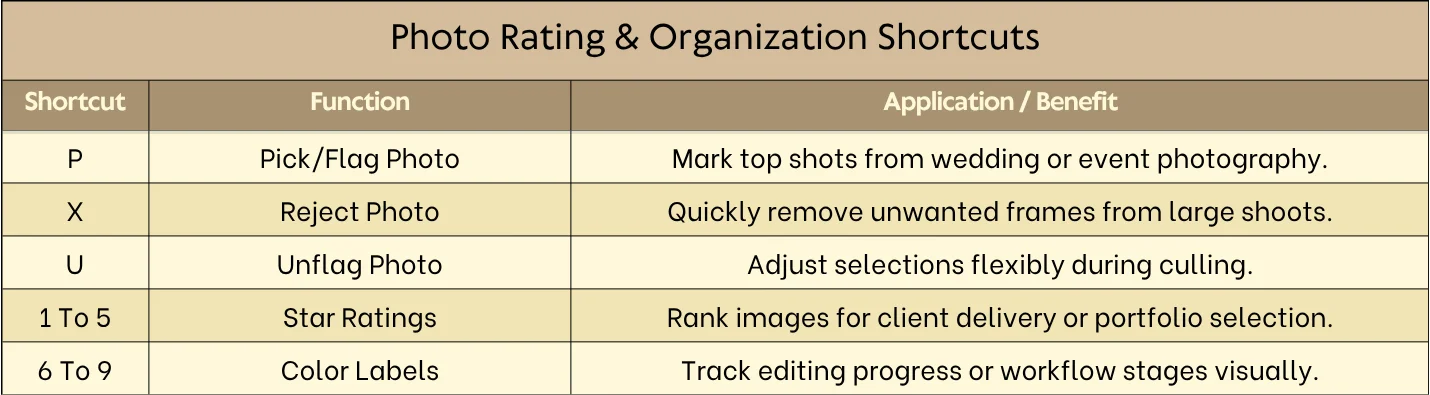
Pick/Flag Photo (P)
When you press P, a photo is chosen. This is a critical feature in working with a large number of pictures, e.g. a wedding or travel photography .
The photos with flags represent the best shots for the next processing step. It accelerates culling and makes essential images easier to find.
Also Check Out: 50 Color Grading Lightroom Mobile Presets
Reject Photo (X)
By clicking X on an image, you can reject the deletion of the file. With the removal of out-of-focus and duplicate shots, your library will remain neat.
Photographers do this during event photography to keep a clean workflow. If, thereby, photos are rejected quickly, enormous amounts of images can be processed in less time.
Unflag Photo (U)
When you press U, the previously flagged picture no longer has a flag. It allows you to change your selections and maintain the necessary organization.
It is a photographer’s assistant when the photographer has to review the portraits or a sales shoot. Just unflagging pictures and not having to do extra clicks ensures proper organisation.
Also Check Out: Aiarty Image Matting: Cutting-Edge AI Background Remover
Star Ratings (1-5)
To assign star ratings, press a number from 1 to 5. Star ratings are one of the ways to classify and rank subjectively by quality or client preference.
This can be implemented in photo editing classes or professional photos to keep the selected group of images that will be further processed.
Colour Labels (6-9)
You can mark photos with different colour labels by pressing the numbers 6 to 9. Colour coding indicates the editing status, priority, or workflow stage.
This method is beneficial during studio shoots or event editing to follow up on progress quickly. The fast access keeps your library visually organised.
Also Check Out: The Complete Lightroom Course
4. Workflow & Export Lightroom Shortcuts
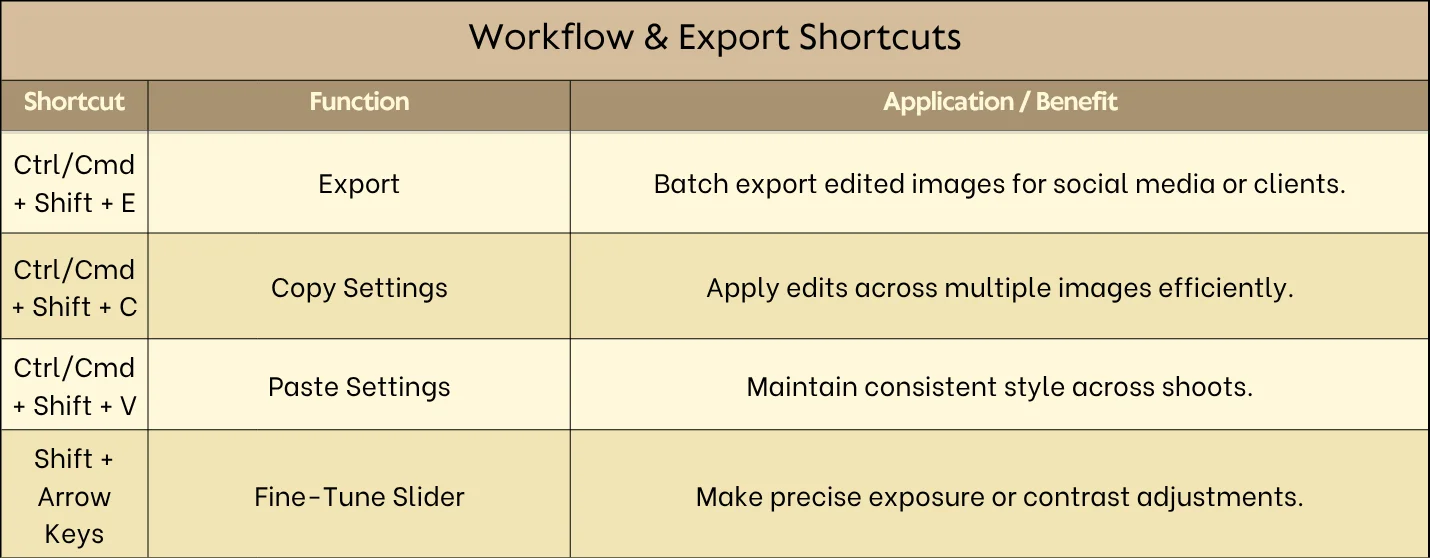
Export (Ctrl/Cmd + Shift + E)
The export dialogue appears when you press Ctrl + Shift + E or Cmd + Shift + E. Export is much quicker when sending images, whether to a client or an online gallery. This Lightroom shortcut is essential.
Professionals in product photography use this shortcut for batch export just as often as they do overall. This turns off the output settings that are always the same.
Copy Settings (Ctrl/Cmd + Shift + C)
The Ctrl + Shift + C or Cmd + Shift + C key combination copies the image adjustment. Using one set of changes across multiple pictures is the correct tool for that. This is a real disaster beater for wedding or event photography with constant lighting.
Paste Settings (Ctrl/Cmd + Shift + V)
In another photo, by pressing Ctrl + Shift + V or Cmd + Shift + V, the adjustments are pasted. For batch editing, combine this with Copy Settings.
The main field for this usage is travel photography or portrait sessions, where time is money. This shortcut carries the style and colour grading from the original.
Also Check Out: Aiarty Image Enhancer: Turn Every Photo Into a Masterpiece
Fine-Tune Slider (Shift + Arrow Keys)
The keyboard Shift + Arrow Keys is for precise tasks only. In studio lighting, fine-tuning is a reality of the photographer’s skill.
Also, in delicate portraits, the retoucher becomes a slave of precision. So, the controlled changes can be performed only by keyboard.
Tips For Memorising Lightroom Shortcuts
Learning Lightroom Classic hotkeys can feel overwhelming at first, but with a structured approach, it becomes effortless.
1. Start with the Most-Used Shortcuts First:
Begin with navigation and essential editing tools, such as Crop, Spot Removal, and the Adjustment Brush.
2. Keep a Visual Cheat Sheet Handy:
Place a printed list near your workspace or a digital one on your monitor.
3. Practice While Editing Real Photos:
Muscle memory develops quickly when shortcuts are used in context.
4. Learn Shortcuts by Workflow:
Follow the order: cull → edit → rate → export. This reduces mental load.
5. Add New Shortcuts Gradually:
Avoid trying to learn all 25 at once. Introduce 3-5 new shortcuts per week.
Conclusion
For a photographer aiming to accelerate their editing workflow, mastering Lightroom keyboard shortcuts is essential. These shortcuts, which range from navigation and viewing to advanced editing and exporting, not only make one work effectively but also creatively.
The benefits of using these hotkeys are that they not only save you time but also preserve your creative vision, whether you are organising wedding shoots, polishing portrait edits, or processing travel photos.
Initially, get acquainted with the most common shortcuts, always practice them and add more as you go along to develop your muscle memory. Minding these 25 essential shortcuts will help you be more efficient, ensure uniformity across large photo libraries, and take your photography workflow to a higher level.
Frequently Asked Questions
1. What are the essential Lightroom keyboard shortcuts every photographer should know?
Start with navigation (G, E, D), editing tools (R, Q, K), and organisation (P, X, 1-5).
2. Can Lightroom shortcuts help with organising large photo libraries?
Absolutely! Use flags, star ratings, and colour labels to streamline organisation.
3. Are Lightroom shortcuts different for Mac and Windows?
Mostly the same; the only difference is modifier keys. Mac uses Cmd and Option, Windows uses Ctrl and Alt.
4. Can I customise keyboard shortcuts to suit my workflow?
Yes! Lightroom Classic allows customisation in Edit → Keyboard Shortcuts.
5. How can Lightroom shortcuts speed up my photo editing process?
Shortcuts reduce repetitive mouse actions, minimise workflow interruptions, and allow you to focus on creativity.
6. Are Lightroom shortcuts the same for Mac and Windows?
Yes, except for modifier keys (Ctrl vs. Cmd, Alt vs. Option).
7. How do I quickly compare edited photos with the original?
Press \ to toggle between before and after views.
8. What are some hidden Lightroom shortcuts that pros use?
Lights Out Mode (L), fine-tune sliders (Shift + Arrow Keys), and copy/paste settings shortcuts.