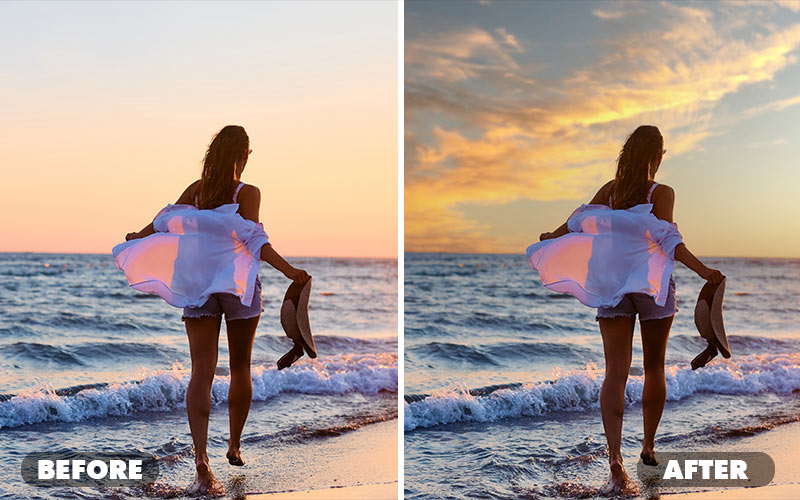
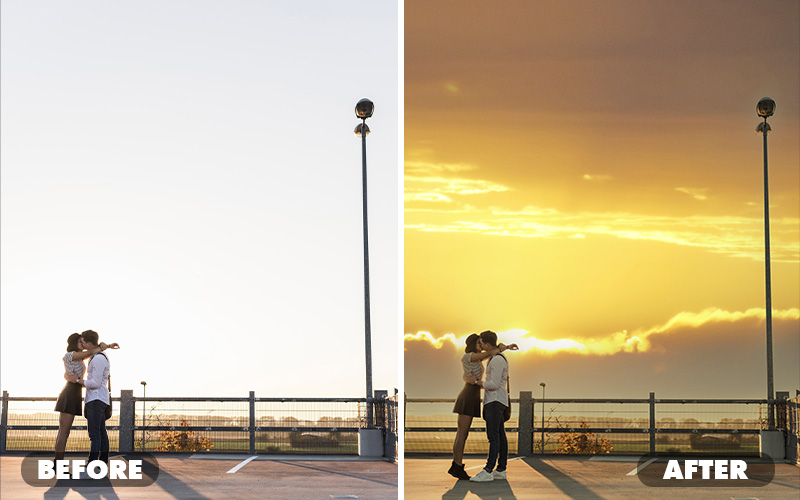
A sky replacement is one of the simplest and yet most powerful effects you can use in your photography. With a few clicks, you can completely transform an existing image’s look and feel, making it much more dynamic.
In this guide, we’ll cover:
- Easy ways to use sky overlays in Photoshop
- 3 Valuable resources for free sky images
- Limitations of the effect
The sky replacement effect will work on virtually any outdoor photo, be it landscape or portrait, day or night, and in nearly any weather.
There are a few limitations, which we will touch upon later, but those exceptions aside, it is a very robust effect that every artist should have in their arsenal.
When to use a Sky Replacement
When should you replace a sky versus maintaining the original? This often comes down to the genre of photography and your intent as the artist. For photojournalism or travel photography that aims to document an authentic scene, replacing the sky would go against the truthful representation of that moment.
However, changing the sky is a fair game for more creative photography. There are no rules – if a new sky enhances your image, go for it!
How to perform a Sky Replacement in Photoshop
The process of sky replacement in Photoshop has become streamlined and easy thanks to their Sky Replacement Tool. As of v22.0, Photoshop has included the Sky Replacement tool, and now anyone can insert a new sky and have it realistically blend with the lighting and colors of your original photo.
Features like Sky Replacement are much easier to master once you understand the fundamentals taught in a complete Photoshop essentials course.
Step 1: Open the Foreground Image
First, open the image containing the foreground you want to keep. You can either roundtrip the photo from Lightroom into Photoshop or open the file directly in Photoshop.
If working from Lightroom, go to Photo > Edit In > Edit in Adobe Photoshop. Or use the keyboard shortcut Ctrl/⌘+E.
To open directly in Photoshop, simply right-click on the image file and choose Open With > Adobe Photoshop.
Step 2: Access the Sky Replacement Tool
With your image open, click on the layer in the layer panel and then go to the Edit menu and click Edit > Sky Replacement.
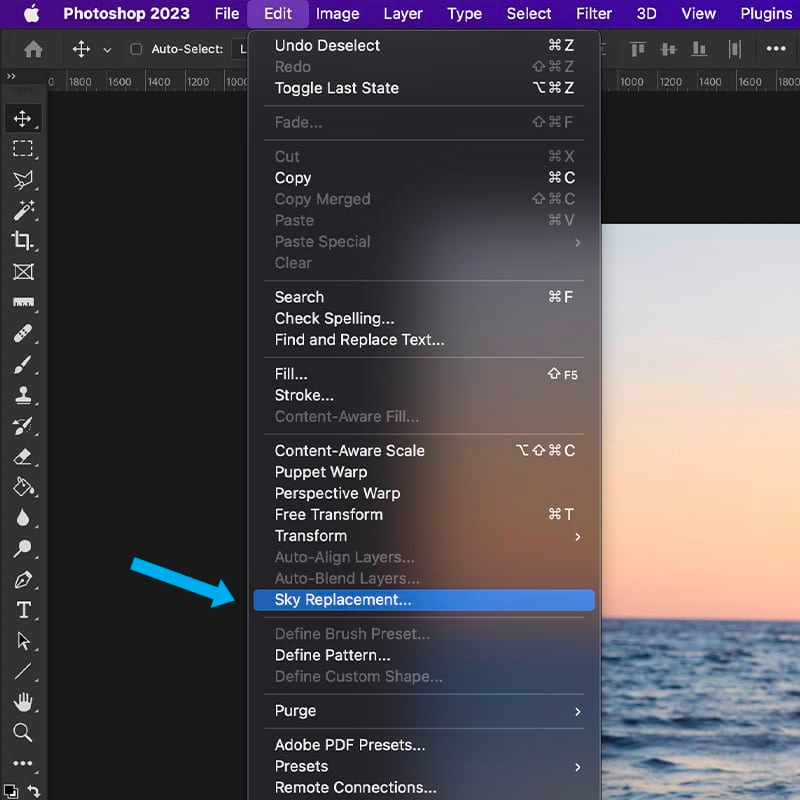
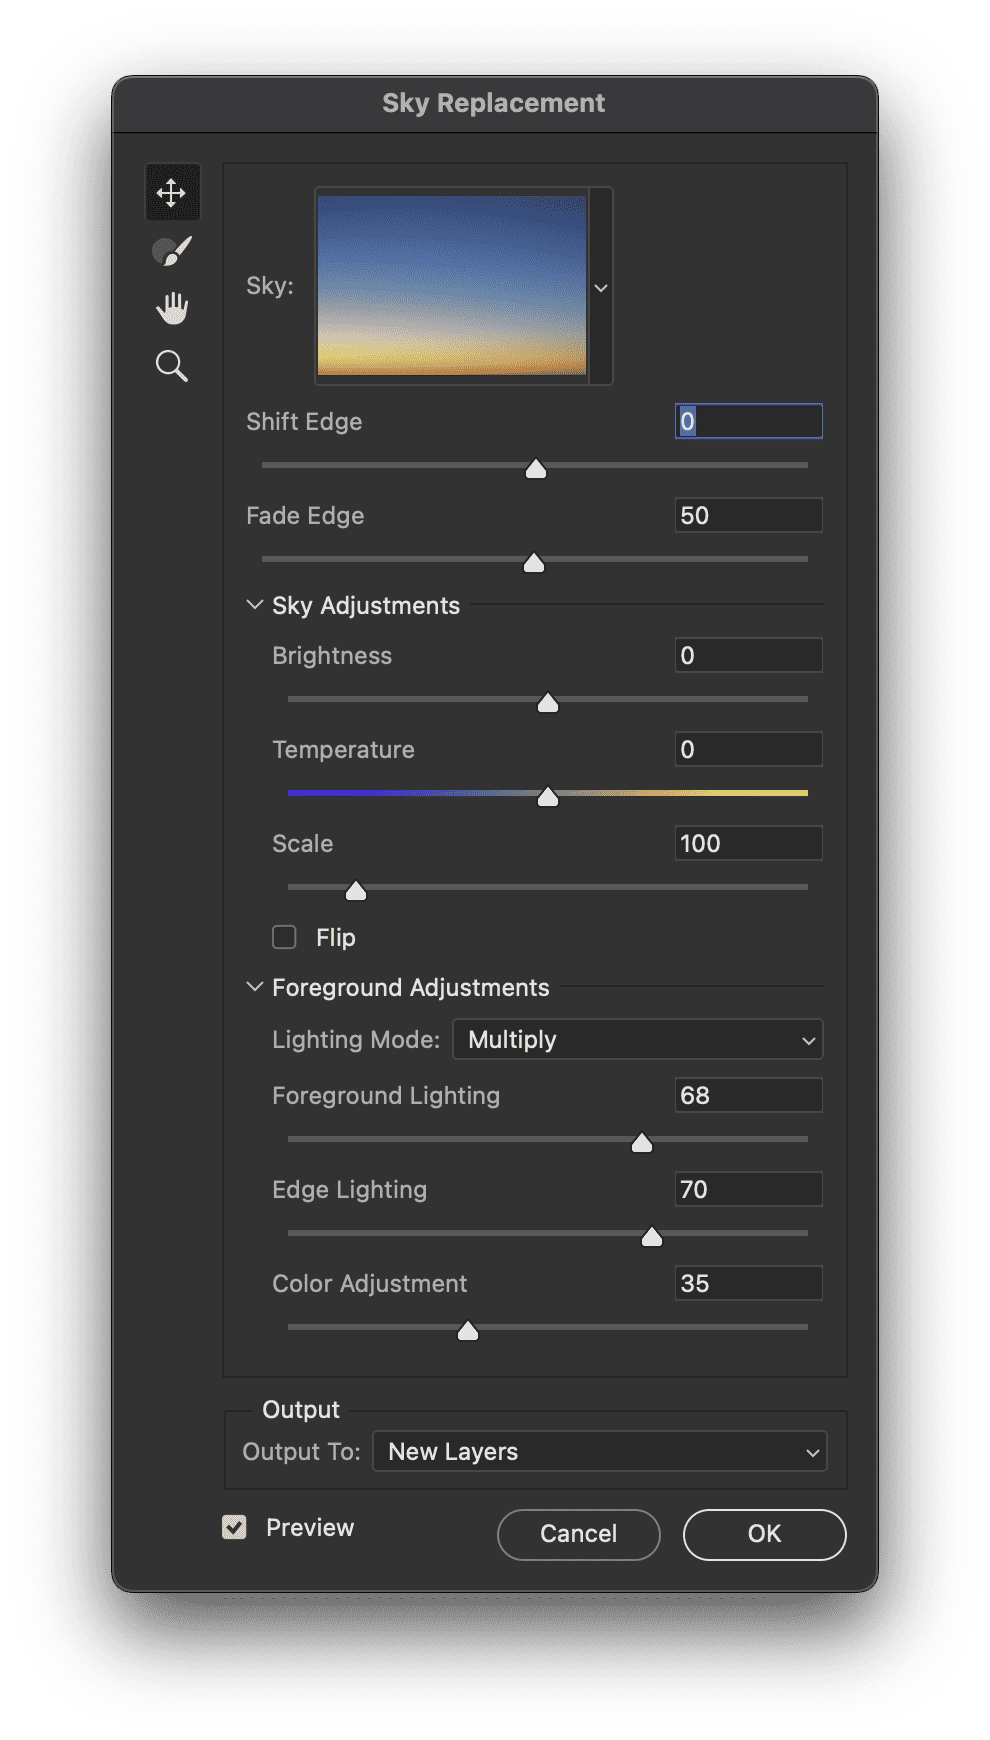
This will open up the Sky Replacement dialog panel.
NOTE: If you don’t see Sky Replacement under the Edit menu, make sure your version of Photoshop is up to date. It was introduced in releases dated after October 2020.
Once the tool is open, it will take a moment to process your photo as it auto-magically extracts your foreground from the sky for you.
Step 3: Choose a Sky
By default, a new (pre-loaded) sky will be swapped into the background of your image. To browse other sky options, click on the arrow next to the current sky thumbnail.
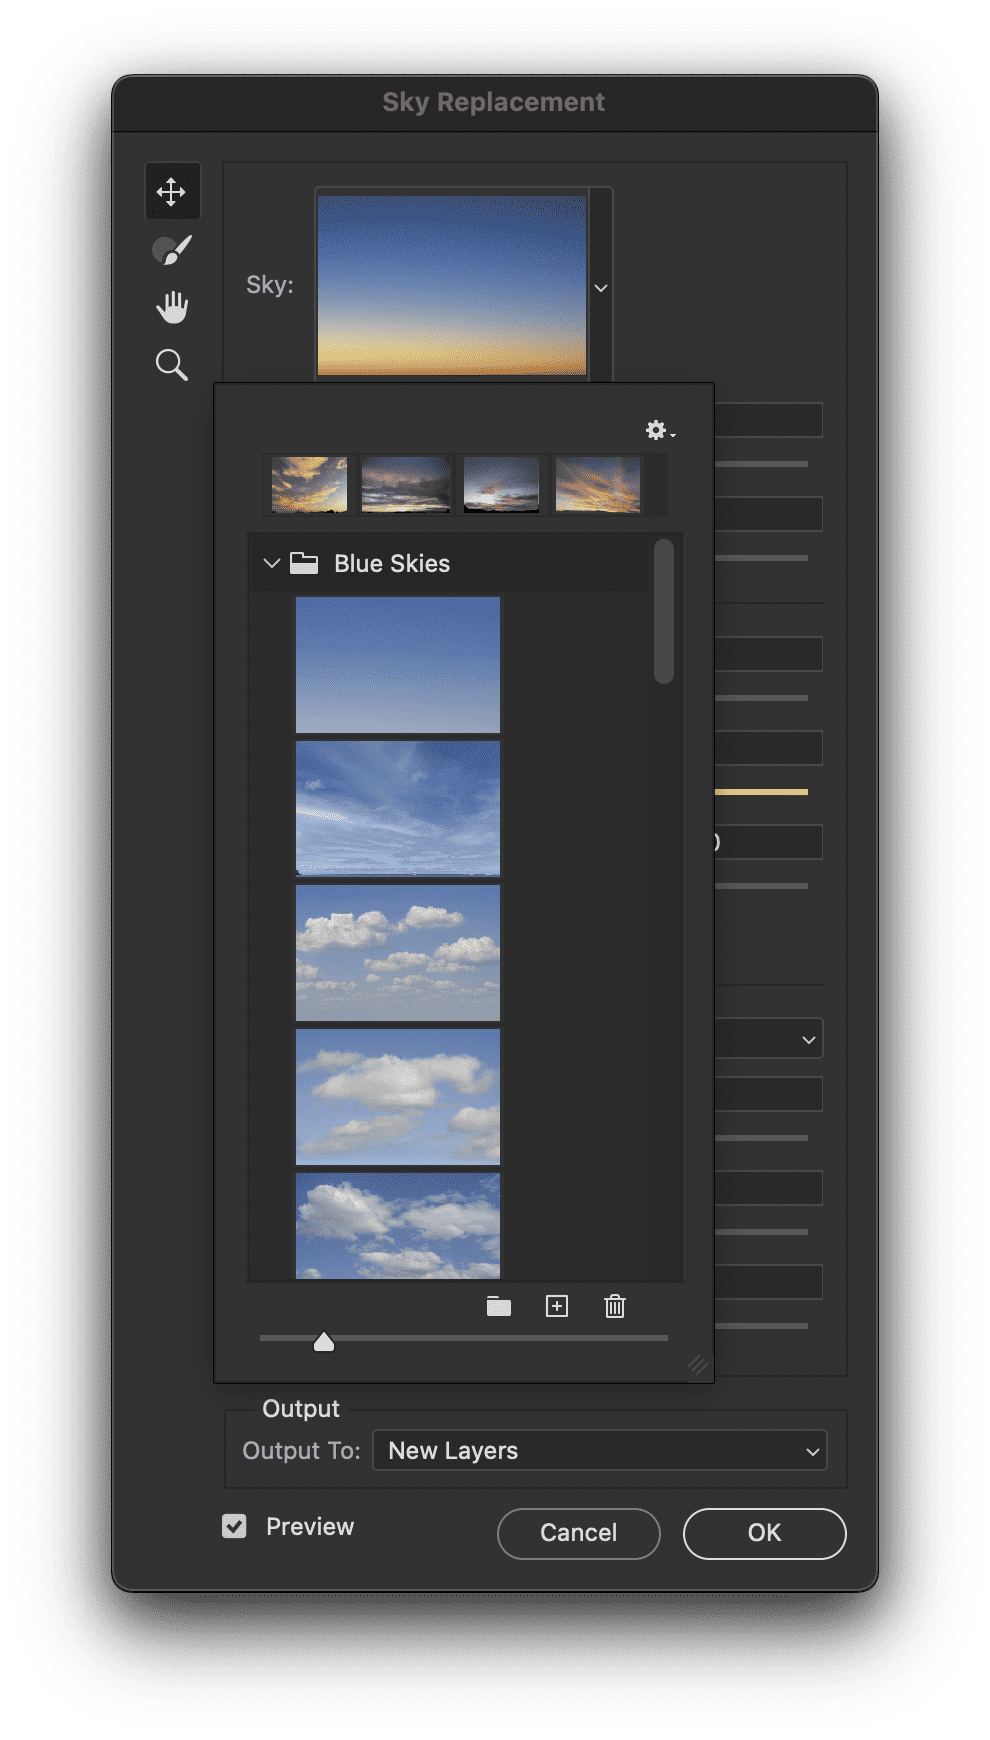
Photoshop includes a small library of pre-loaded skies categorized into folders like Blue Skies, Spectacular Skies, and Sunsets.
As you scroll through the sky presets, pay attention to the light direction and color in each sky preset. Choose something that matches the lighting of your foreground for the most realistic results.
The goal is to improve the sky, but we’re not trying to change day to night, midday to sunset, etc.
NOTE: If you don’t see a sky that you like, don’t worry we’ll show you a way to add thousands of new sky overlays in just a moment.
Step 4: Adjust the Sky Integration
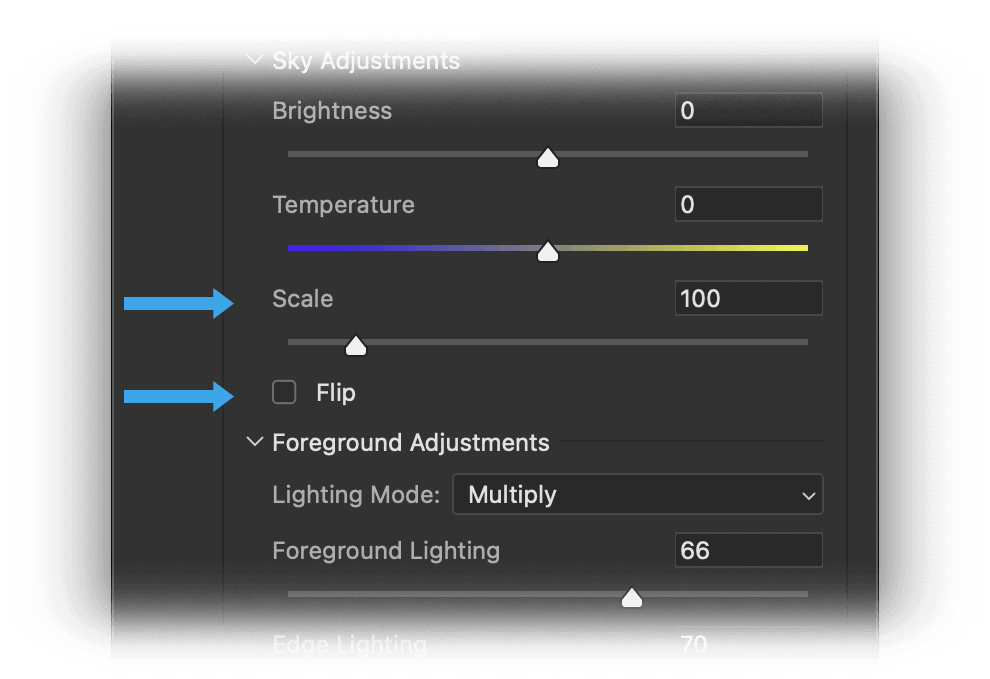
You can make adjustments such as flipping the sky orientation by clicking on the box marked Flip and using the Scale slider to adjust the size of the replacement sky.
While Photoshop does an admirable job selecting and masking the sky region, you may need to refine the edges.
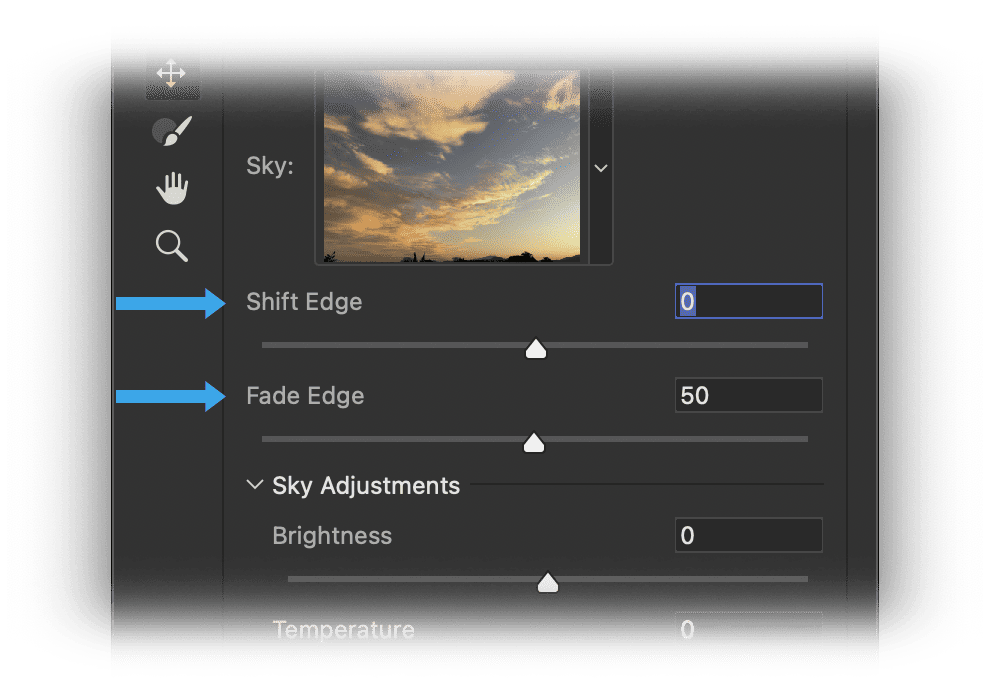
Use the Shift Edge slider to move the border between foreground and sky. And adjust Fade Edge to control the feathering transition.

The Sky Move tool lets you grab and reposition the sky within the frame. With the Sky Brush, you can manually erase or paint back in parts of the original sky.
Step 5: Adjust Lighting
Matching the light color, intensity, and other properties will go a long way in selling the realism of your composite.
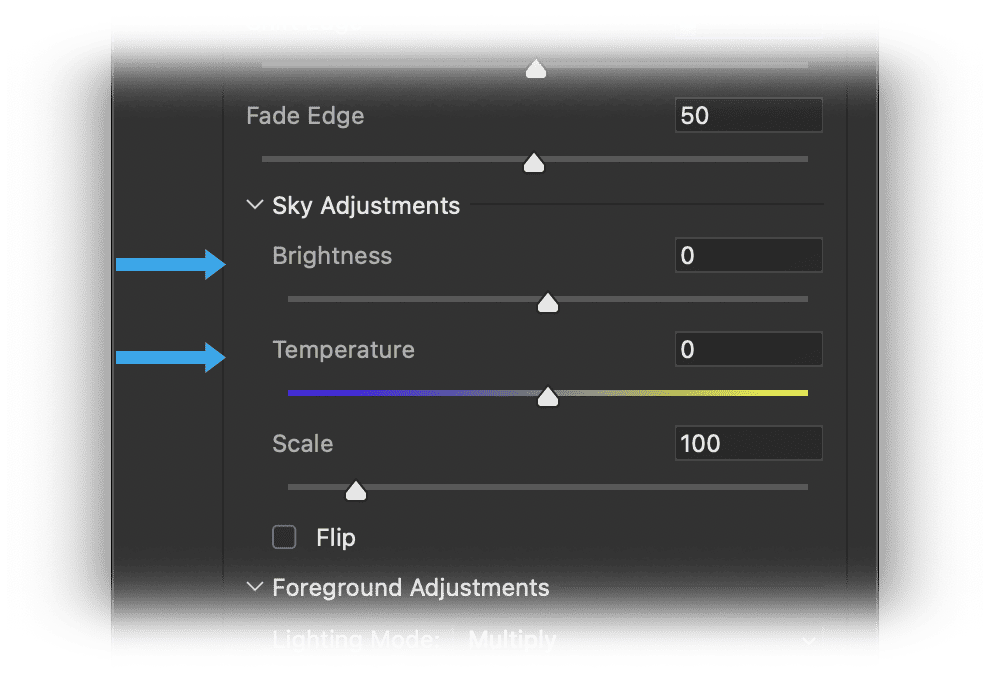
First, use the sliders within the Sky Replacement dialog to modify the look of the sky itself. You can change its brightness and color temperature.
Next, tweak the lighting of the foreground region. The dedicated sliders allow you to alter the Lighting Mode, Foreground Lighting, Edge Lighting, and Color Adjustment.
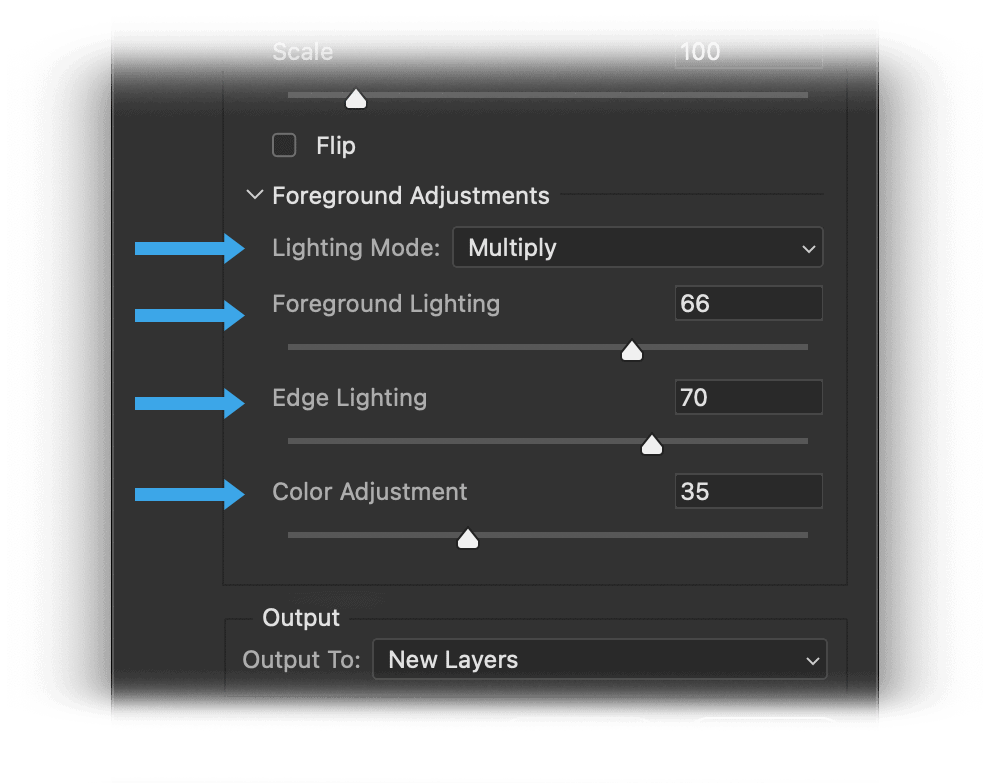
Play around with these settings to better blend and balance the foreground with your new sky.
Our new sky is looking nice, but there’s one adjustment that we can’t make within this tool, which is blur.

In our original photo, the sky is empty, and we can’t detect that it’s actually out of focus. But the water in the distance gives us a clue about the depth of field we should try to emulate. We’ll solve this issue in a moment.
6. Apply Changes
Before we can move on, we need to apply the changes. Within the Sky Replacement panel, you’ll see two options for output:
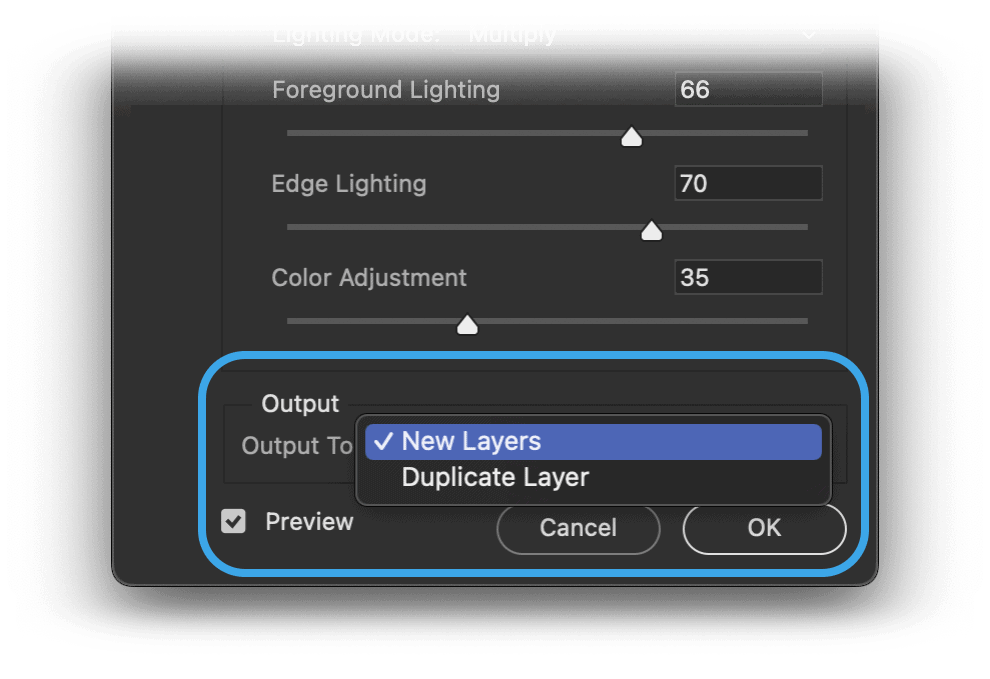
Duplicate Layer
Using Duplicate Layer mode is not recommended, as it will leave you no opportunity to fine-tune the effect later. This condenses the sky replacement edits into a single new background layer. The foreground and new sky get merged together.
New Layers
This option keeps all of our various adjustments separated into different layers. It is great if you want the flexibility to continue fine-tuning the effect later. You can go back and continue refining the sky masking and lighting.
It creates a Sky Replacement group in your Layers panel containing:
- The sky layer w/ layer mask
- An Edge Lighting Group
- Edge lighting desaturation and levels effects
- A foreground lighting layer
- A foreground color adjustment layer
NOTE: Exploring these generated layers is a great way to learn exactly what Photoshop is doing “under the hood” as it creates the sky replacement effect. Not only that, but you can continue to tweak and adjust the settings as needed.
Choose the New Layers option and click OK to commit the changes. Photoshop will now generate a folder with the six new layers in your Layers panel.
7. Final Tweaks
As mentioned before, we need to blur the clouds to appropriately match the depth of field of the original image.
To do this, open the Sky Replacement Group and select the Sky layer.
Next, go to the Filter menu and click on Filter > Blur > Gaussian Blur.
Adjust the blur slider until the results look natural.
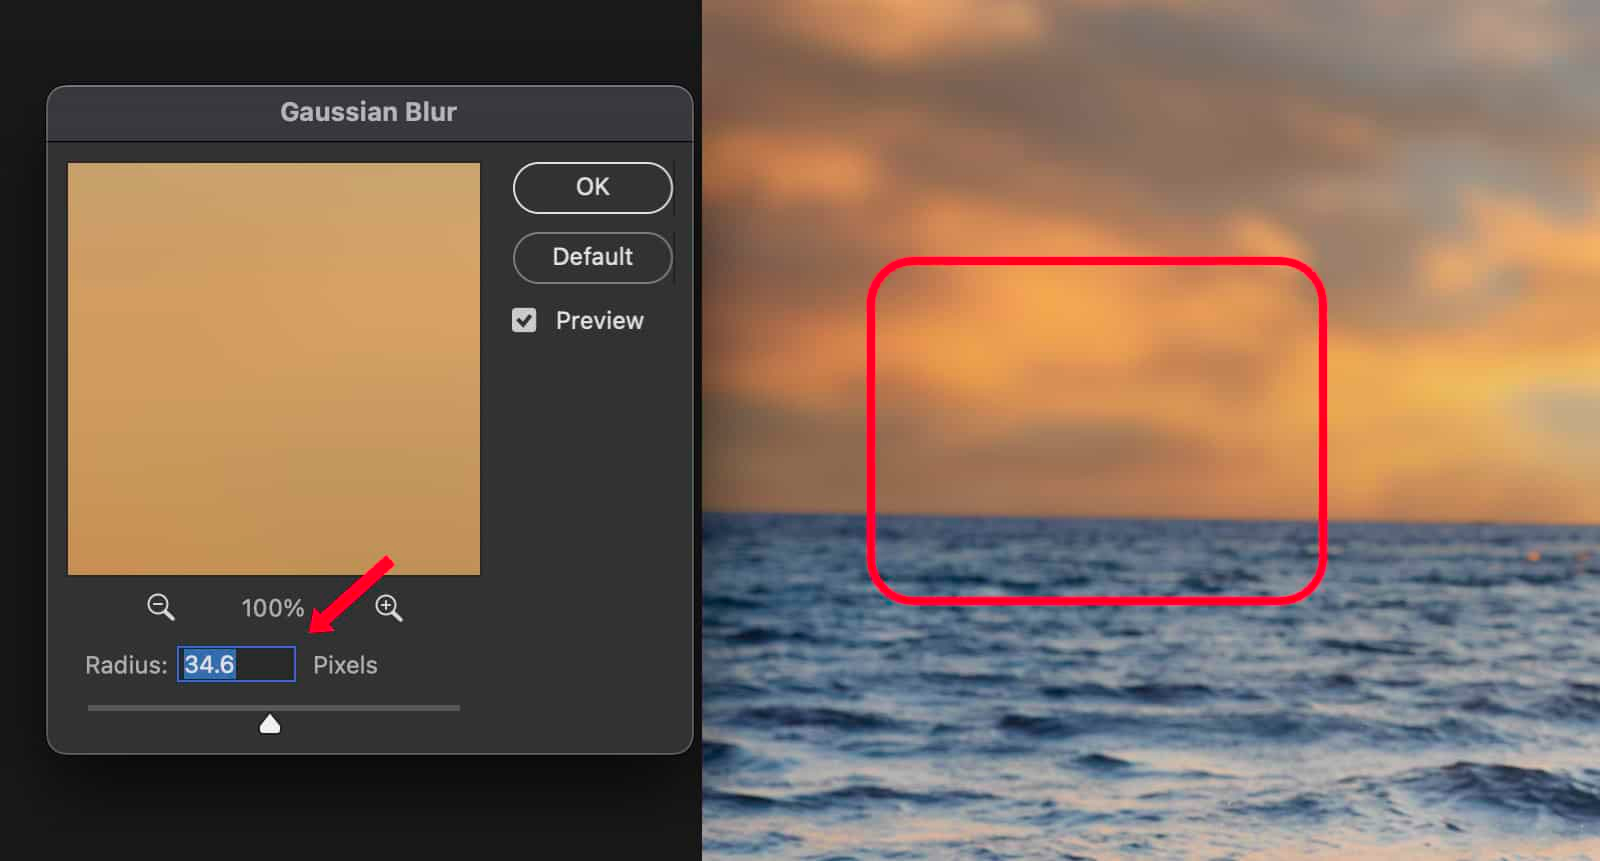
This is too high of a Radius value, and the image is too blurry. You can see that the detail level of the sky doesn’t match that of the water.
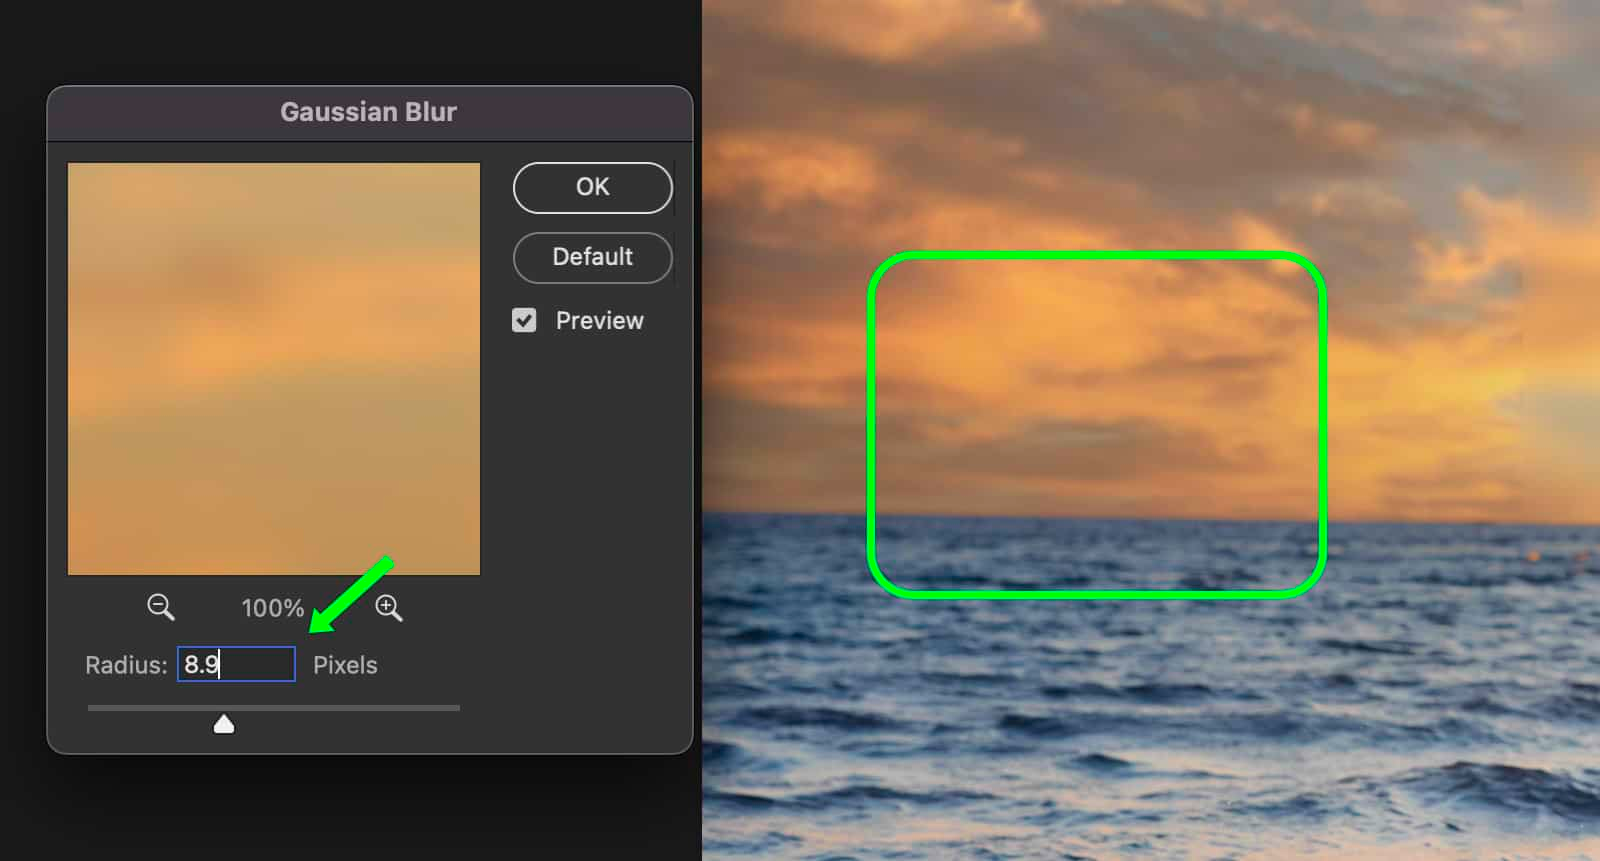
This is a much better result, with both the sky and the water having a similar amount of blur. Click OK when you are finished to apply your changes.
Technically, we should use the Lens Blur option to best mimmic a depth of field blur, but it doesn’t allow us to adjust and preview the effect in real time, so it is difficult to dial in the proper amount of blur.
Now our sky replacement is finished. We can continue to adjust and tweak the settings if desired or flatten the layers into a single finished composition.
Butwhat if you couldn’t find the perfect sky in the pre-loaded options? They are pretty limited, after all. What if you need more variety and more skies than what Adobe offers? We’ll tackle that in the next section.
Resources for Free Sky Overlays
Thankfully, we are not limited to the preinstalled options offered by Adobe. We can load and use our own images to unlock different skies and new opportunities.
Option 1: Download a Sky Overlays Pack
A quick way to build your sky library is by downloading a pack of sky overlays online. There are many free and paid options available.
Look for packs that offer high-resolution sky images compatible with Photoshop. They should have skies suitable for different locations, times of day, and lighting conditions.
Some things to look for in a good skies pack:
- High-resolution JPEG or TIFF files
- Various sky types (sunrises, sunsets, stormy, cloudy, etc.)
- Realistic and dramatic skies
- Lighting direction from multiple angles
- Styles appropriate for your needs
- 30+ sky images minimum

The Ultimate 1000+ Sky Overlays Bundle is the perfect option to instantly add over 1000 high-quality skies to your library.
Here’s how to use it:
Add the New Library to Photoshop
Once you’ve downloaded a pack, you can import the new skies into Photoshop’s library.
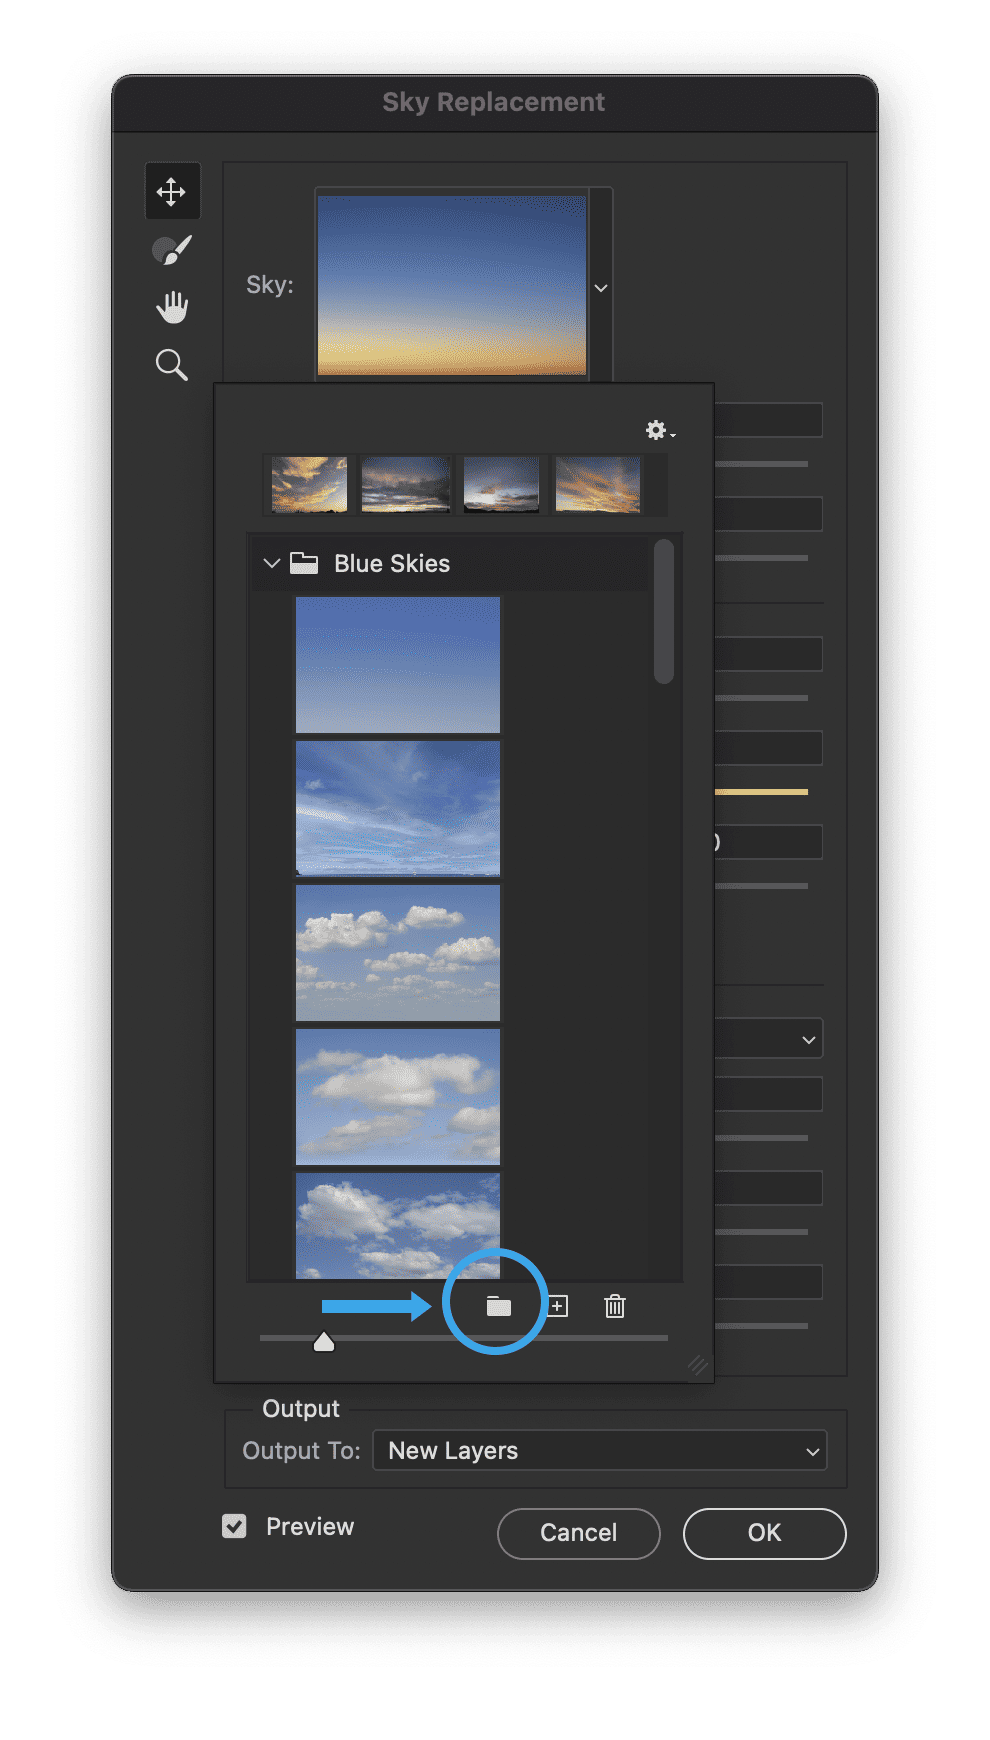
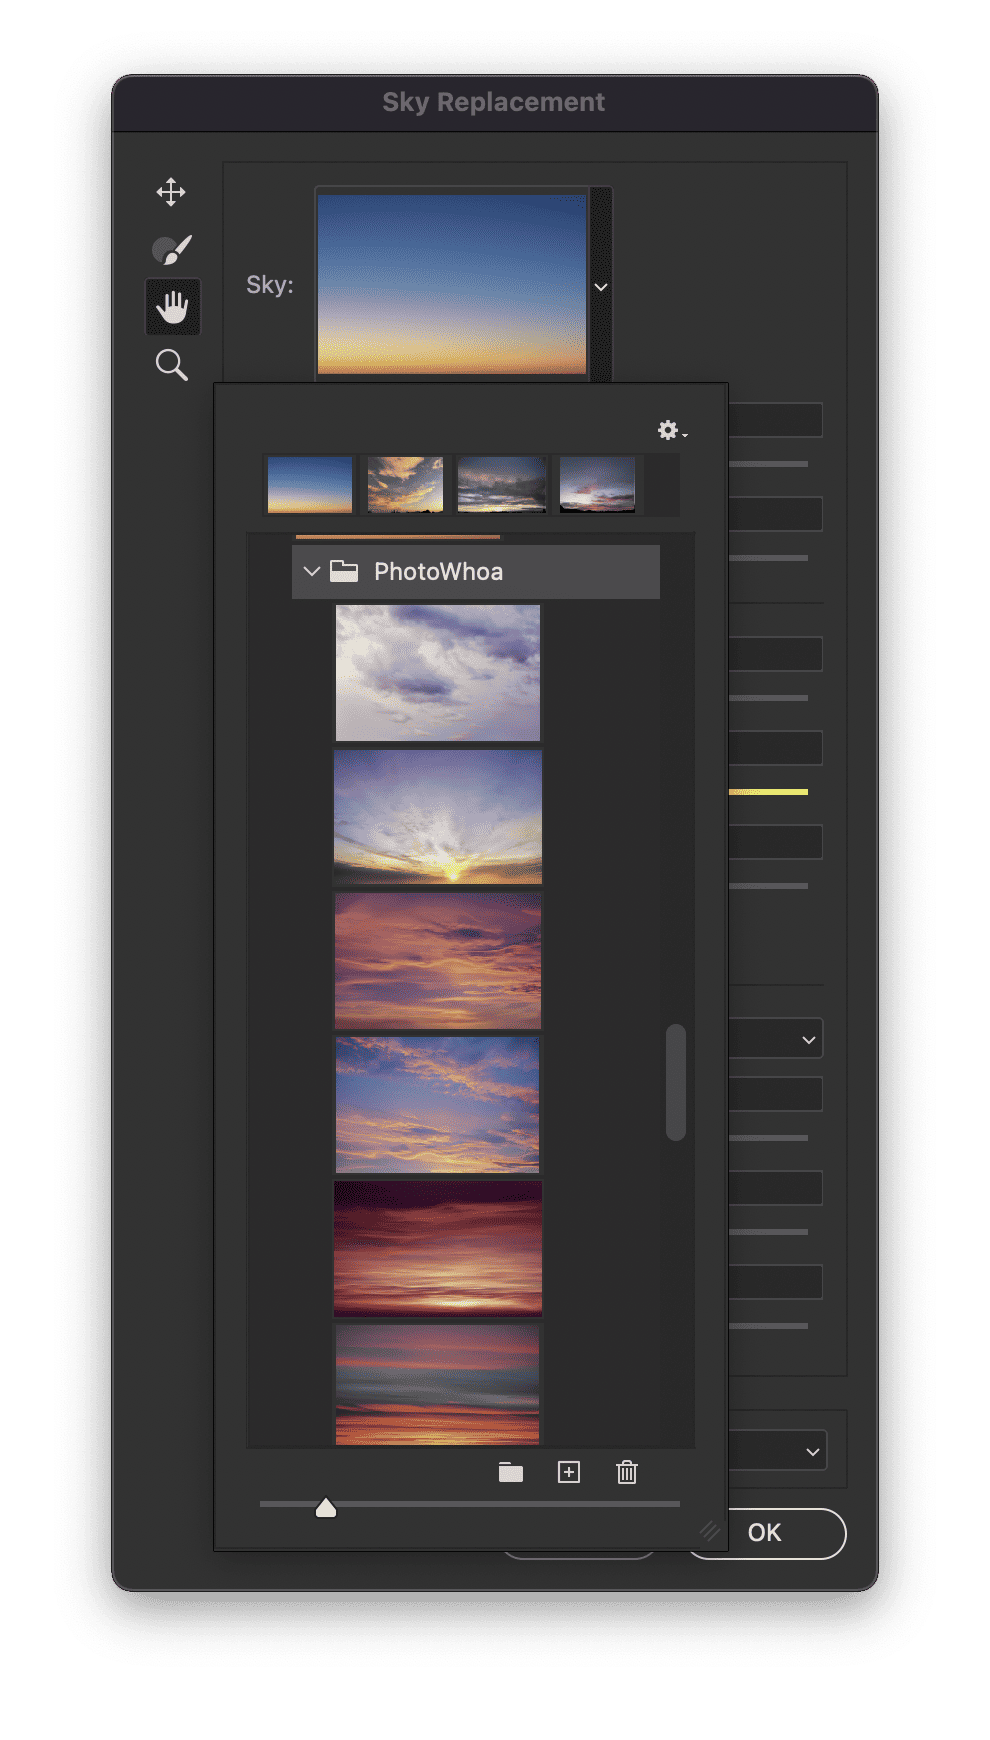
Simply re-open the Sky Replacement tool (Edit > Sky Replacement), and click on the arrow next to the sky thumbnail, then click on the folder icon at the bottom of the panel.
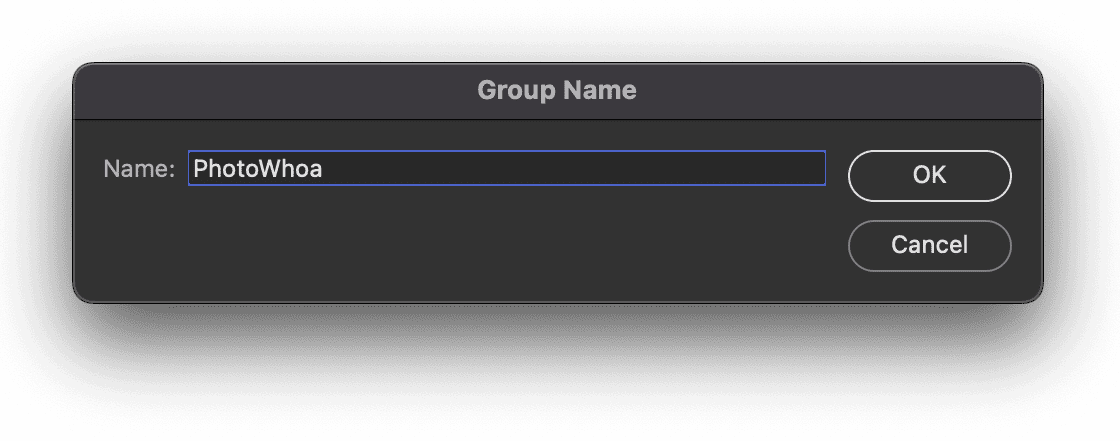
Enter a name for your new folder/group, (we’ve named ours “PhotoWhoa”) and click OK.
Next, select the new group and click on the plus icon (+) at the bottom of the panel to add new sky files to the folder.
Navigate to the images that you want to add, and you can select one or multiple items (using shift + click). Click Open when you have all the files you want to import selected.
This will import all of the selected images into your new folder. You can now repeat these steps as many times as needed to import and organize your sky presets however you like.
You can even create folders within folders to organize your sky overlays by time of day, season, weather pattern, or any other method of your choosing.
Now that you have the entire bundle inside your library, it’s simpler than ever to click through the options and choose the best replacement sky for your original image.
Having a full pack available from the start will save you time capturing all possible skies yourself. And it ensures you have options suitable for any lighting or composition.
Option 2: Use a Quicktime Video
Wait, what? Use a QuickTime video in Photoshop? That’s right. It’s a little-known feature that in modern versions of Photoshop, you can import and work directly with Quicktime and other video file formats.
What’s more, there are quite a few options for sky videos available that offer stunning new sky options. You can download ProRes sky overlay videos for free from websites like FX Elements.
The best option is to find a sky timelapse video as that will have a wide variety of skies all neatly contained within a single video file.
Open the Quicktime File
Once you have a Quicktime downloaded and ready to use, simply open it in Photoshop as you would any other image file.
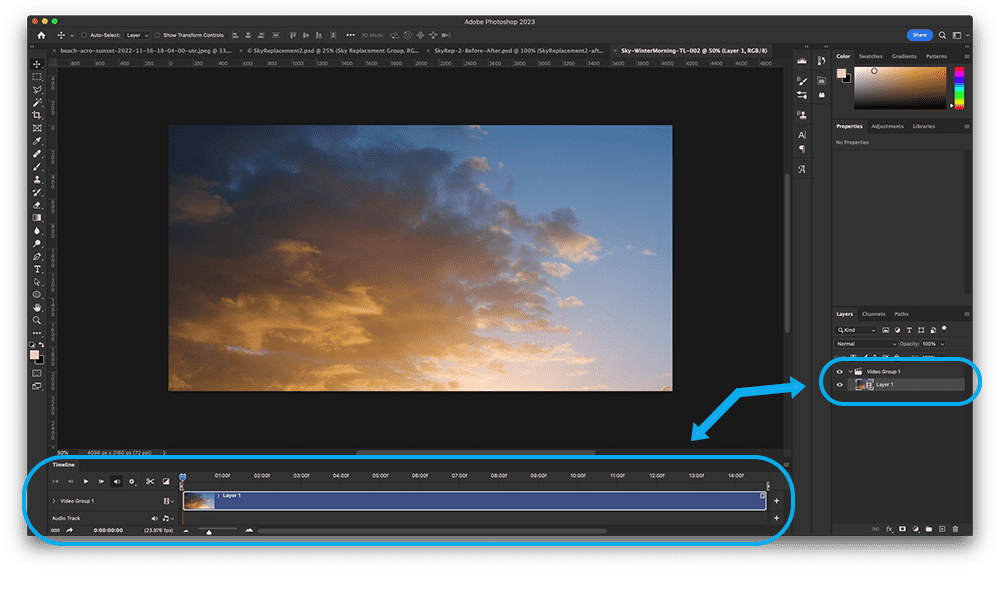
With the Quicktime file open in Photoshop, you should see a new layer folder called “Video Group 1,” and at the bottom of the interface, you will find the Timeline panel. You can scrub through the video timeline by clicking and dragging on the playhead indicator.
How to Use in a Sky Replacement
To use the frames from a video in a sky replacement, you’ll need to either export the frames to files or copy and paste the entire image into another composition.
And to export, use the File > Export > Quick Export as PNG option from the file menu.
To copy and paste a separate layer, simply select the entire image with Ctrl/⌘+A followed by Ctrl/⌘+C.
Once you have the exported file, you can import it into your library or copy and paste it into an existing “Sky Replacement Group.”
To do this, navigate to the composition with your sky replacement and paste (Ctrl/⌘+V) the image above the current sky layer.
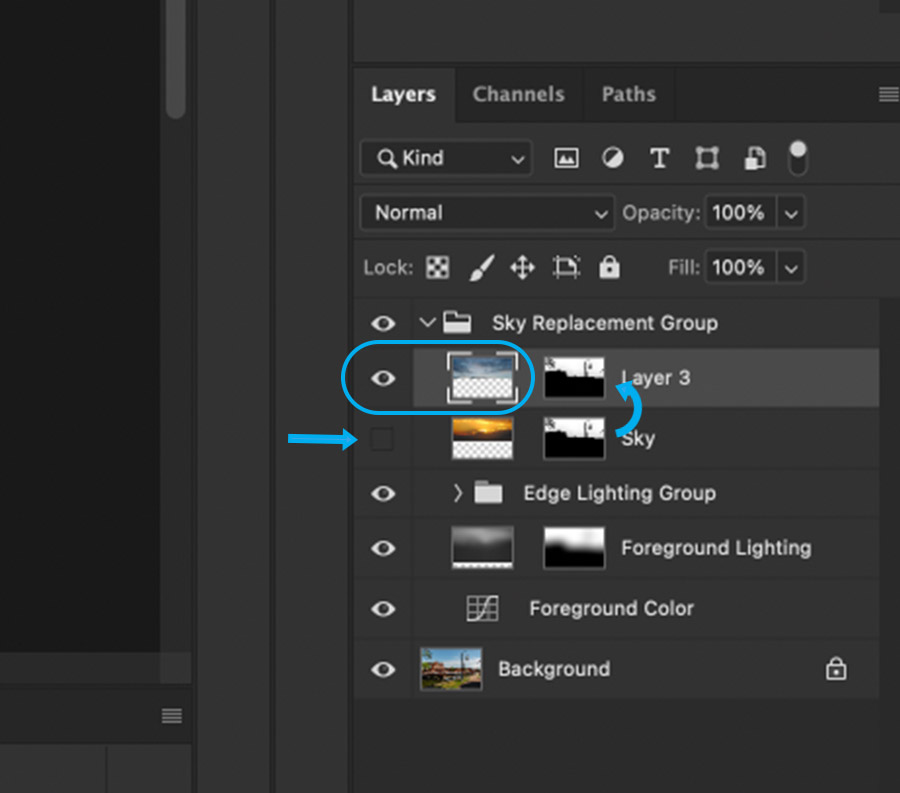
To finish the effect, copy and paste the layer mask from the Sky layer onto your new sky layer, and be sure to disable the old layer by clicking on the eye icon.
Option 3: Add Your Own Sky Images
Last but not least, you can use your own sky images in your compositions. To do so, you’ll follow the same procedures mentioned above to get your images into Photoshop and into your sky replacement effects.
You can also create a new Sky group here, if desired, to keep your added skies organized. And the great thing is that your sky images don’t have to be captured on a professional camera to be useful. Because these skies will often be out of focus, you can capture your own skies on a smartphone or any other camera that you have handy.
Sky Replacement Limitations
Okay, so does this work for every photo and in every situation? Unfortunately, no. While it is true that most of the time, if there is a sky in the photo, you can easily replace it, sadly, there will be times when there isn’t much that you can do.
So, what are these limitations, and why?
The most common deal breaker for a sky replacement is when the photo has a foreground that interacts with the sky in a complicated or troublesome manner.
What does that mean exactly? Well, take a look at these examples below:
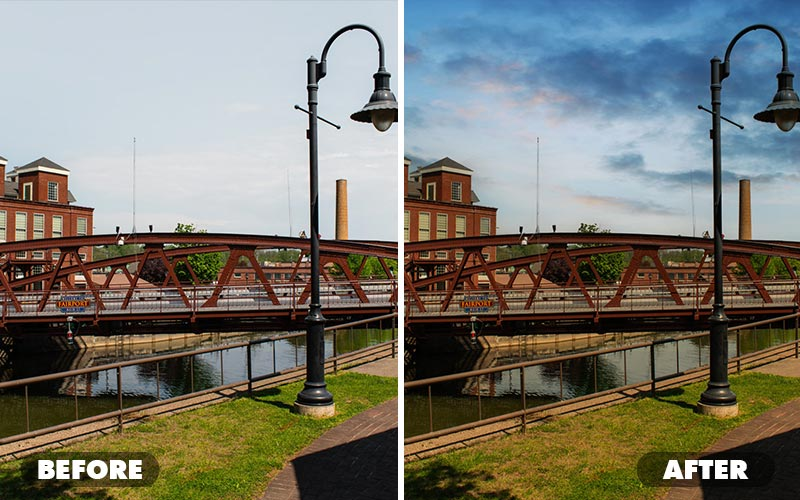
Blown-out, sky + foreground fringing

In this example, you can tell that the sky was overexposed in the original image, which caused fringing on the trees and buildings that intersect the sky.
When we attempt to perform a sky replacement in Photoshop, the new sky is not overexposed; thus, the foreground objects’ fringing feels unnatural. Sure, we can replace the sky, but we cannot re-create the foreground objects at proper exposure levels. Therefore, it creates a jarring mismatch.
In this case, the best we can do is to slightly overexpose our new sky using the levels, curves, or exposure tools (take your pick).
Fog & Weather
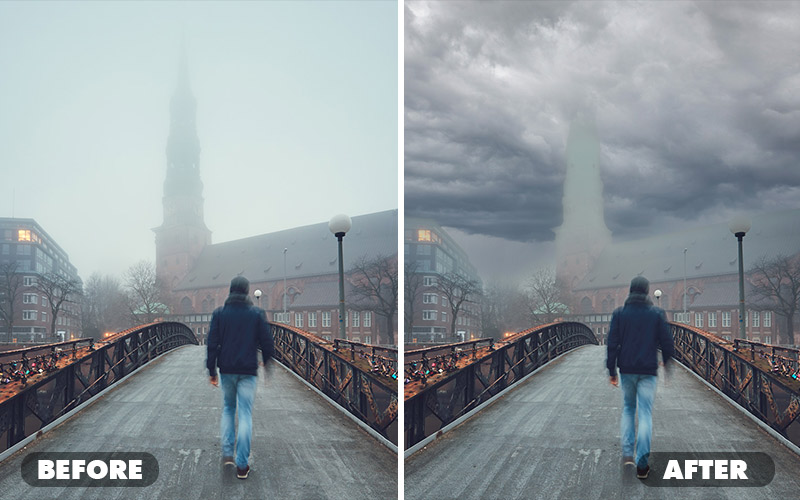
In this example, we can see that fog is occluding the building, because the fog is thick enough to visibly block the buildings; it is unrealistic to expect to see clouds in the sky.
Just as with the previous example, we can attempt the sky replacement in Photoshop, but the Photoshop effect will be difficult to achieve.
In this case, the best course of action is to choose a stormy or overcast sky, then feather the edges of the foreground considerably, and try reducing the opacity of the sky image layer so that it has a very subtle effect.
Transforming a foggy sky into a golden sunset simply isn’t feasible, but a cloudy sky with slightly more detail and drama may be possible if done with care.
Ready to master Photoshop? Explore this Photoshop learning path and discover the editing techniques professional photographers use every day.
Conclusion
Whether you want a clear blue sky or a dramatic sunset, Photoshop’s Sky Replacement feature can give you just about any kind of sky background that you can imagine.
With just a few clicks, you can insert more compelling skies that better complement your foreground.
Also, build up your own image library skies to use within Photoshop. Use resources such as PhotoWhoa to quickly and easily start your library.
Then, keep your eyes open for interesting sunsets, stormy clouds, or moody dusk skies that you can capture and store for future compositions.
Don’t be afraid to get creative with a Photoshop sky replacement. With practice, you can easily swap a new sky and instantly take your images to the next level!