Do you ever have difficulty getting suitable exposures? If you do, the exposure triangle is ideal to help you achieve good exposure for your photos. This article provides insight into this simple and useful tool. By reading this article, you will have a theoretical and practical understanding of the exposure triangle.
Table of contents
All About The Exposure
Exposure simply refers to the quantity of light that reaches the camera sensor. Photography is all about capturing light. Subsequently, the aim of photography is to get a photo with good exposure. This means the photo does not come out overexposed or underexposed. The exposure triangle in photography is extremely helpful in avoiding these outcomes.
An overexposed photo is when a photo comes out too bright. This means too much light has reached the camera sensor and the photo turns out rather white.

An underexposed photo is when a photo comes out too dark. This means not enough light has reached the camera sensor and the photo turns out rather black.
Also read: How To Make A Steel Wool Sparkler Device For Photography

As a photographer, our job is to use the settings available to us to get the exposure right. This can be challenging because no environment or situation is the same.
To achieve this goal, it is key to get the correct balance with the ISO, shutter speed, and aperture. These three settings are used to get a good exposure and are the three sides of the exposure triangle.
Also, check out How Big Is A 4×6 Photo
How A Camera Works
The forthcoming sections will explain the ISO, shutter speed, and aperture, followed by the exposure triangle. But first, knowing what happens inside a camera when a photo is taken is beneficial.
After pressing the shutter button, whatever you are taking a photo of goes into the camera lens as light. This is where the process starts, and the journey it takes through the camera is how a digital image is produced.
Once the light enters the camera lens, it reaches the first adjustable setting, which is the aperture. This is the hole within the lens where the opening size can be adjusted to allow more or less light.
After the light passes through the lens aperture, it gets to the camera’s shutter. The shutter is in front of the camera sensor and is like a window that is always closed. When a photo is taken, it opens to allow light into the camera sensor. The amount of time set for it to be open is referred to as the shutter speed.
Having passed through the shutter, it reaches the camera’s sensor, which gathers the light. This is where the final adjustable setting lies, which is the ISO. By controlling the camera’s sensitivity to light, the ISO brightens or darkens the photo. Then, the digital image is produced.
Also read: After Dark Photography: Creating Magical Photos With Light
The ISO
The ISO is the first side of the exposure triangle. It simply controls the camera’s sensitivity to light, which regulates the exposure of a photo. The chosen ISO setting will determine the brightness of the photo produced by the camera.
It is typically displayed in numeric values. ISO 100 is considered a low ISO, and ISO 16000 is considered a high ISO. A low-value ISO produces a darker image, and a high-value ISO produces a brighter image.
It is essential to note that noise will start to appear in the photo when using high ISO settings. In photography, when a photo starts to appear grainy, the grain is referred to as noise. The amount of noise produced will increase as you increase the ISO.
Also, check out: Masterclass: Learn The Art Of Steel Wool Photography

The Shutter Speed
The shutter speed is the second side of the exposure triangle. It is the amount of time set for the camera’s shutter to be open. The length of time can be between fractions of a second and several minutes.
Fast shutter speeds are used in conditions with a lot of light, such as outdoors in the daytime. They can also be used to take a photo where the subject is stationary. The key attribute of a fast shutter speed is to freeze motion. Fast-moving subjects like horses running are captured as if they were stationary.
Also read: Exploring the World of Creative Light Painting Photography

Slow shutter speeds are typically used in conditions of low light. They provide more light to the camera sensor, enabling a camera to produce a photo with visible subjects in environments with low light. Due to the slow shutter speed, the camera must not move to produce a clear photo. Therefore, it must be placed on a tripod or a steady, flat surface.

The Aperture
The aperture is the third side of the exposure triangle. It is the size of the opening in the camera lens when a photo is taken. It is a hole within the lens where light travels and is adjustable to allow more or less light in.
The f-stop f/3.5 is considered a large aperture, and the f-stop f/22 is considered a small aperture. Typically, you would use a large aperture in a dark environment and a small aperture in a light environment.
The aperture helps control the brightness of a photo and the depth of field. In basic terms, the depth of field is the amount of blur around the subject that is in focus.
Using a large depth of field will produce a photo with most of the image in focus, regardless of the subject’s distance to the camera. Using a small depth of field will produce a photo with only part of the image in focus, and the rest of the image will be blurry.
Also check out: Masterclass: Light Painting Photography

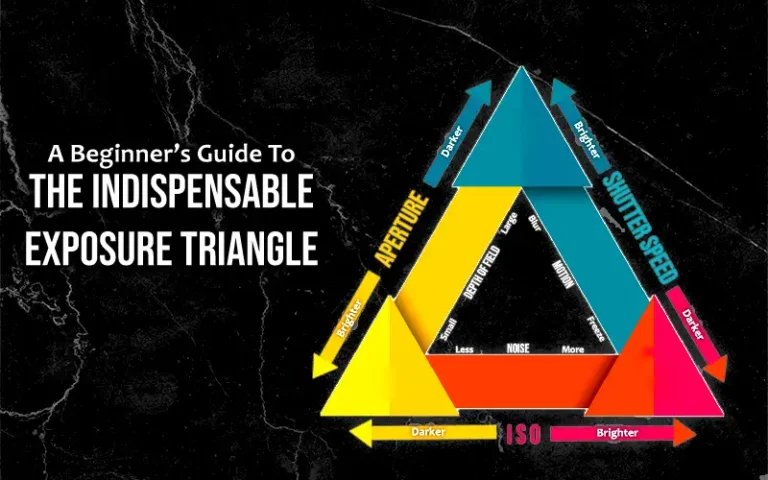
The Exposure Triangle Revealed
After explaining the three sides of the exposure triangle, it is important to explain how they all work together. A firm understanding of how they work together is highly advantageous as a photographer. It enables you to manually control your camera, making it easier to take photos in various environments.
The triangle in photography is very helpful for understanding how the ISO, shutter speed, and aperture work together. It provides clarity for achieving the correct balance between the three as they control and determine a camera’s exposure.
The image below is the exposure triangle. It illustrates the relationship between these three settings and how they determine a photo’s exposure.
Also check out: The Ultimate Steel Wool Photography Guide

Main Points Of The Exposure Triangle
The main point to take away from analysing the exposure triangle is that when adjusting one of the elements in the direction of the white arrow, the following must happen: One or both of the other two elements need to be moved in the direction of the black arrow. This is how to maintain exposure and get your camera to produce a good-exposed photo.
In short, when adjusting one of the elements, an opposite adjustment needs to be made to one or both of the others to get a good exposure. It is important to remember that an adjustment made to one of the settings impacts the others.
In addition to this, other factors must be considered when adjusting:
(1) Adjusting the ISO will increase or decrease the noise.
(2) Changing the aperture will increase or decrease the depth of field.
(3) Altering the shutter speed will change how motion is captured.
For these reasons, it is important to consider whether these adjustments will change your photo positively or negatively.
Streamline your business with this must-have photography contracts bundle
The Exposure Triangle Summary
The exposure triangle comprises the ISO, shutter speed, and aperture. They work together to regulate the amount of light that goes to the camera sensor. Not only do they have an impact on the exposure, they also have their individual side effects on the photo:
(a) The ISO can increase or decrease grain/noise from an image.
(b) The shutter speed can blur or freeze an action for the image.
(c) The aperture controls the depth of the image field.
Getting the correct balance between the three is imperative. Always remember that if one of them gets adjusted, at least one of the others must also be adjusted to maintain the correct exposure. This means getting a photo that is neither underexposed nor overexposed.
Like this post? Check out more fantastic photography content here.